开发模式与生产模式
开发模式
开发阶段可通过下面命令快速启动ES服务:
# 使用“单节点发现”可以在单节点开发集群中绕过“ bootstrap checks”
docker run -p 9200:9200 -p 9300:9300 -e "discovery.type=single-node" -e "cluster.name=dev-es" elasticsearch:6.8.0
在另一个台机器上测试是否启动成功:curl ‘http://localhost:9200/?pretty’ 。
其实也可以在另一个台机器浏览器里输入:http://192.168.1.220:9200/?pretty
重要提醒,请设置 cluster.name!spring-data-elasticsearch 的 application.yml 中必须设置 “spring.data.elasticsearch.cluster-name=dev-es”,否则一直报错:”failed to load elasticsearch nodes : org.elasticsearch.client.transport.NoNodeAvailableException: None of the configured nodes are available”。
生产模式
搜索
简单搜索
以 query 开头,内部放匹配语法,如 term、match、multi_match、match_phrase:
GET _search
{
    "query" : {
        "match" : {
            "about" : "rock climbing"
        }
    }
}
嵌套对象搜索
须使用 tag.name 格式:
GET _search
{
  "query": {
    "match": {
      "tag.name": "流行"
    }
  }
}
这里的 tag 是 style 模型的一个对象属性:
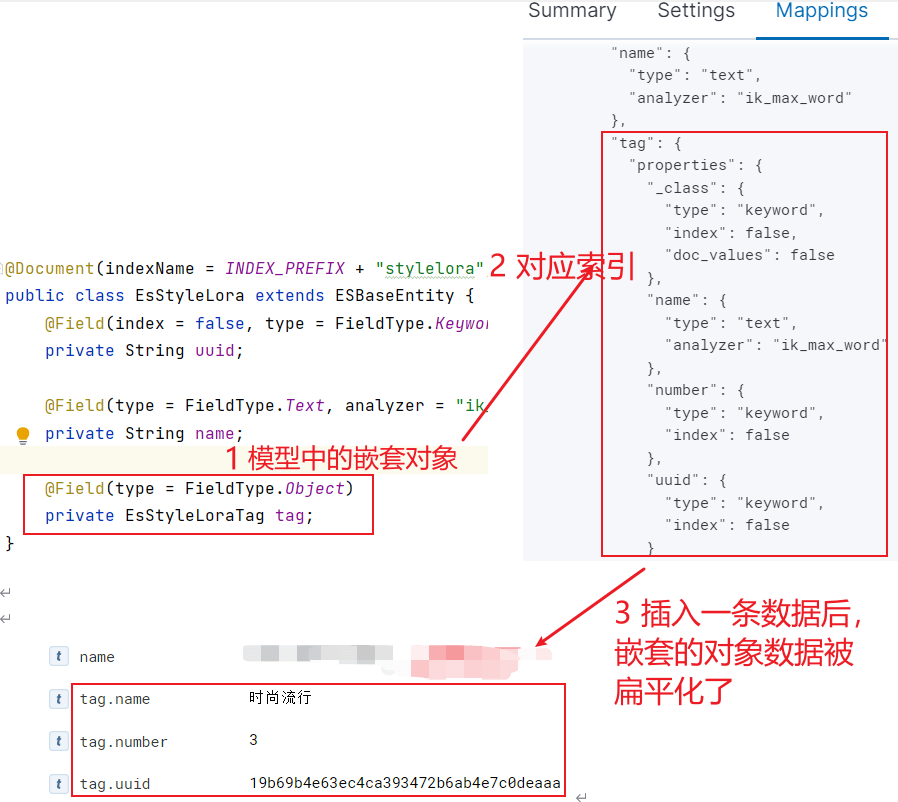
若要在 tag 字段上使用不同的分词器,直接在嵌套对象里加额外字段就好了,再结合 multi_match 查询,那么一个字段就支持多种分词器查询了。
嵌套数组搜索
嵌套数组搜索时,query里面放 nested,并指定 path后,再嵌一个 query:
GET _search
{
  "query": {
    "nested": {
      "path": "items",
      "query": {
        "multi_match": {
          "query": "田野",
          "fields": [
            "items.description^1.0"
          ],
          "type": "best_fields",
          "operator": "OR"
        }
      }
    }
  }
}
嵌套查询用于解决在某实体的对象数组中查询的问题,例如上面的查询对应下面的模型与索引:
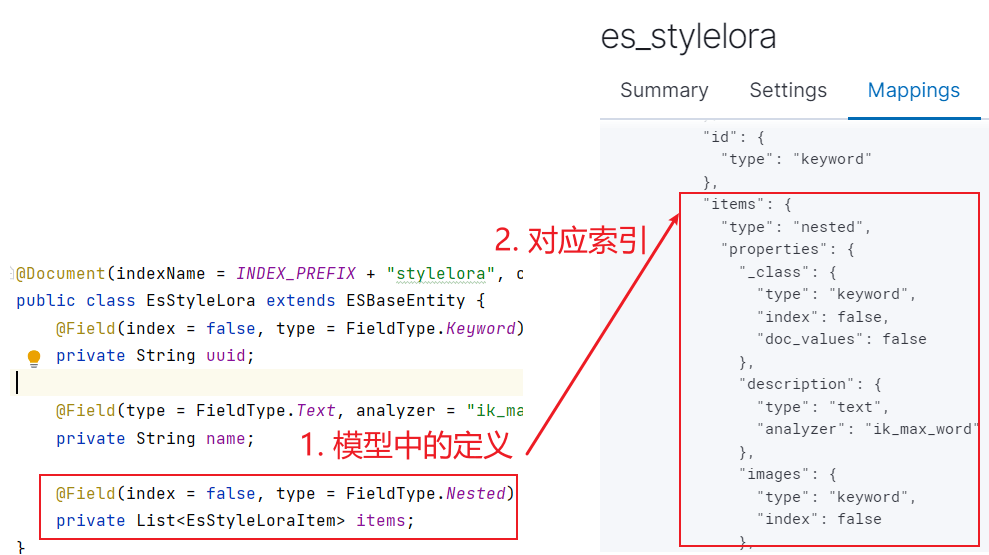
下面是一个更复杂的,嵌套对象数组 items 中的元素里又放了对象数组 tags,此时查询如下:
GET _search
{
  "query": {
    "nested": {
      "path": "items.tags",
      "query": {
        "match": {
          "items.tags.name": "运动"
        }
      }
    }
  }
}
嵌套的对象数组,每个 object 元素不能像我们所期望的那样工作,Lucene没有内部对象的概念,所以Elasticsearch 会将 object 元素层次结构扁平化为一个字段名称和值的简单列表,具体可参考此文。
布尔搜索
子句
布尔搜索的关键字是 bool,布尔查询是最常用的组合查询,支持的子查询类型共有四种:
- must 子句:文档必须匹配must查询条件;
- should 子句:文档应该匹配should子句查询的一个或多个;
- must_not 子句:文档不能匹配该查询条件;
- filter 子句:过滤器,文档必须匹配该过滤条件,跟must子句的区别是,filter不影响查询的 score;
上面的各个子句之间的逻辑关系是与(and),这意味着,一个文档只有同时满足所有的查询子句时,该文档才匹配查询条件,作为结果返回。
should 子句
should子句一般是数组字段,包含多个should子查询,通过显示设置 minimum_should_match 来改变匹配行为,下面此值设为2,那么一个文档必须匹配 should 子句查询中的两个才会认为匹配了:
GET _search
{
  "query": {
    "bool": {
      "should": [
        { "match": { "name": "网球" } },
        { "match": { "name": "蓝色" } },
        { "match": { "name": "大海" } }
      ],
      "minimum_should_match": 2
    }
  }
}
filter、must_not 过滤子句(含 must 子句)
对查询结果的过滤,建议使用过滤(filter)子句和must_not子句,这两个子句属于过滤上下文。
过滤上下文不影响查询的评分,而评分计算让搜索变得复杂,消耗更多CPU资源,因此,filter和must_not查询减轻搜索的工作负载。经常使用filter子句,使得ElasticSearch引擎自动缓存数据,当再次搜索已经被缓存的数据时,能够提高查询性能。
对于下面的查询请求,must子句处于query context中,filter子句处于filter context中:
- 在query context中,must子句将返回同时满足匹配(match)查询的文档;
- 在filter context中,filter子句是一个过滤器,将不满足查询的文档过滤掉(是 and 关系),并且不影响匹配文档的score;
GET _search
{
  "query": {
    "bool": {
      "must": [
        { "match": { "name": "网球" } },
        { "match": { "name": "蓝色" } },
        { "match": { "name": "大海" } }
      ],
      "filter": [
        { "match": { "desc": "田野" } },
        { "match": { "tag": "时尚" } }
      ]
    }
  }
}
分组查询
下面来实现例如:(A and B) or (C and D) or (E and F) ,只需把布尔查询作为should子句的一个子查询:
GET _search
{
  "query": {
    "bool": {
      "should": [
        {
          "bool": {
            "must": [
              { "term": { "topics": 1 } },
              { "term": { "topics": 2 } }
            ]
          }
        },
        {
          "bool": {
            "must": [
              { "term": { "topics": 3 } },
              { "term": { "topics": 4 } }
            ]
          }
        }
      ],
      "minimum_should_match": 1
    }
  }
}
再看一个嵌套查询与非嵌套组合查案例:
GET _search
{
  "query": {
    "bool": {
      "should": [
        {
          "match": { "name": "蓝色" }
        },
        {
          "nested": {
            "path": "items",
            "query": {
              "multi_match": {
                "query": "fiction 网球场",
                "fields": [
                  "items.description^1.0",
                  "items.promptStyle^1.0"
                ]
              }
            }
          }
        }
      ]
    }
  }
}
search_after 深分页
一般的分页需求我们可以使用form和size的方式实现,但是这种分页方式在深度分页的场景下应该是要避免使用的。深度分页会随着请求的页次增加,所消耗的内存和时间的增长也是成比例的增加,为了避免深度分页产生的问题,elasticsearch从2.0版本开始,增加了一个限制:
index.max_result_window =10000
若使用Scroll api进行高效深度滚动,但滚动上下文代价很高,建议不要将其用于实时用户请求,可以用于导出数据等任务。这时 search_after 深分页上场了。
首先获取第一页数据,包含了 sort 排序值的数组,这些 sort 排序值将被用于 search_after 参数里,以便抓取下一页的数据:
POST _search
{
    "size": 10,
    "query": {
        "match" : {
            "title" : "苹果"
        }
    },
    "sort": [
        {"date": "asc"},
        {"_id": "desc"}
    ]
}
将 sort 排序值传递给 search_after 以抓取下一页,由于是多字段排序,所以 search_after 是个数组:
GET _search
{
    "size": 10,
    "query": {
        "match" : {
            "title" : "苹果"
        }
    },
    "search_after": [1463538857, "654323"],
    "sort": [
        {"date": "asc"},
        {"_id": "desc"}
    ]
}
匹配
term 匹配
完全匹配,也就是精确查询,搜索前不会再对搜索词进行分词拆解,此文讲的很详细。
GET _search
{
    "query" : {
        "term" : {
            "about" : "rock climbing"
        }
    }
}
match 匹配
与 term 搜索不同,会先将搜索词拆分,拆完后,再去匹配,此文讲的很详细。
Elasticsearch 默认按照相关性得分排序,即每个文档跟查询的匹配程度。也就是说你搜索”rock climbing”的话,只有”rock”的也可能被搜出来,只是相关性得分会很低,会排在后面点。例子:
GET /megacorp/employee/_search
{
    "query" : {
        "match" : {
            "about" : "rock climbing"
        }
    }
}
返回结果有两条,第一条:”about”:”I love to go rock climbing“,第二条:”about”:”I like to collect rock albums“。
multi_match 匹配(推荐)
multi_match 查询为能在多个字段上反复执行相同查询提供了一种便捷方式,它基于 match 查询用于搜索多个字段。例如下面的例子在 name 和 description 字段上分别搜索 “网球”,默认是 or 的关系:
GET _search
{
  "query": {
    "multi_match": {
      "query": "网球",
      "fields": [
        "name^1.0",
        "description^1.0"
      ]
    }
  }
}
若要修改多个查询词之间的逻辑运算符为 and 关系,可以用 operator 参数,此时必须在多个字段上同时满足才算匹配:
GET _search
{
  "query": {
    "multi_match": {
      "query": "网球",
      "fields": [
        "name^1.0",
        "description^1.0"
      ],
      "operator": "and"
    }
  }
}
match_phrase 短语匹配
找出一个属性中的独立单词是没有问题的,但有时候想要精确匹配一系列单词或者短语 。 比如, 我们想执行这样一个查询,仅匹配同时包含“rock” 和 “climbing” ,并且 二者以短语 “rock climbing” 的形式紧挨着的雇员记录。为此对 match 查询稍作调整,使用一个叫做 match_phrase 的查询:
GET /megacorp/employee/_search
{
    "query" : {
        "match_phrase" : {
            "about" : "rock climbing"
        }
    }
}
毫无悬念,返回结果仅有 John Smith 的文档。
通配符与正则表达式查询
GET /.ds-logs-generic-device_raw_log-2023.07.12-000001/_search
{
    "query" : {
      "wildcard" : {
            "message" : "*hello*"
        }
    }
}
分析
Elasticsearch 有一个功能叫聚合(aggregations),允许我们基于数据生成一些精细的分析结果。聚合与 SQL 中的 GROUP BY 类似但更强大。这里有个复杂案例:ElasticSearch 嵌套分桶的过滤与排序
histogram 统计(按时间)
histogram 统计能够对字段取值按间隔统计建立直方图(针对数值型和日期型字段),这里以日期型字段 @timestamp 为例讲解:
GET /logs-generic-device_raw_log/_search
{
  "size":0,
  "aggs": {
  	"按年月日统计,再按 host 字段统计": {
		"date_histogram": {
			"field": "@timestamp",
			"fixed_interval": "1d",
			"format": "yyyy-MM-dd"
		},
		"aggregations": {
			"hostAgg": {
				"terms": {
					"field": "host",
					"size": 10,
					"min_doc_count": 1,
					"shard_min_doc_count": 0,
					"show_term_doc_count_error": false
				}
			}
		}
  	}
  }
}
返回值:
{
  "aggregations" : {
    "按年月日统计,再按 host 字段统计" : {
      "buckets" : [
        {
          "key_as_string" : "2023-04-03",
          "key" : 1680480000000,
          "doc_count" : 272,
          "hostAgg" : {
            "doc_count_error_upper_bound" : 0,
            "sum_other_doc_count" : 0,
            "buckets" : [
              {
                "key" : "192.168.1.254",
                "doc_count" : 268
              },
              {
                "key" : "192.168.2.154",
                "doc_count" : 4
              }
            ]
          }
        }
      ]
    }
  }
}
参考:elasticsearch之十九springboot测试高级搜索聚合
(5)分析与 histogram 统计(按时间)
下面的 java 代码不仅包含日期型 histogram 统计,还包含嵌套 FiltersAggregationBuilder 过滤分组:
    public ChartsDataset analyseRawData(String cycleTime, List<String> groupNames, ChartsTypeEnum type, String deviceName) {

        // 1. 创建 queryBuilder

        BoolQueryBuilder myquery = new BoolQueryBuilder();

        if (groupNames.size() > 0) {
            BoolQueryBuilder messageQuery = new BoolQueryBuilder();
            for (String groupName : groupNames) {
                messageQuery.should(QueryBuilders.matchQuery("message", groupName));
            }
            myquery.must(messageQuery);
        }

        if (StringUtils.isNotBlank(deviceName)) {
            String messageQuery = "*" + deviceName + "*";
            WildcardQueryBuilder wildcardQueryBuilder = QueryBuilders
                    .wildcardQuery("message", messageQuery)
                    .caseInsensitive(true);
            myquery.must(wildcardQueryBuilder);
        }


        DateHistogramInterval interval = null;
        String dateFormat = null;
        switch (cycleTime) {
            case "day":
                interval = DateHistogramInterval.DAY;
                dateFormat = "yyyy-MM-dd";
                break;
            case "week":
                interval = DateHistogramInterval.WEEK;
                dateFormat = "yyyy-MM-dd";
                break;
            case "month":
                interval = DateHistogramInterval.MONTH;
                dateFormat = "yyyy-MM";
                break;
        }

        // 1. 创建 FiltersAggregationBuilder

        FiltersAggregator.KeyedFilter[] keyedFilters = new FiltersAggregator.KeyedFilter[groupNames.size()];
        for (int i = 0; i < groupNames.size(); i++) {
            String groupName = groupNames.get(i);
            keyedFilters[i] = new FiltersAggregator.KeyedFilter(groupName, QueryBuilders.termQuery("message", groupName));
        }

        FiltersAggregationBuilder filterAgg = AggregationBuilders
                .filters("subAgg", keyedFilters)
                .otherBucket(false)
                .otherBucketKey("other")
                // 使用 message 字段会报错,此字段不支持聚合的,是 text 类型。
                .subAggregation(AggregationBuilders.count("num").field("_id"));

        // 2. 创建 date_histogram AggregationBuilder
        DateHistogramAggregationBuilder dateHistogramAggBuilder = AggregationBuilders.dateHistogram("myHistogram")//自定义名称
                .calendarInterval(interval)
                //.fixedInterval(interval)   //设置间隔
                .minDocCount(0)           //返回空桶
                .field("@timestamp")
                .format(dateFormat)
                //.offset("+0h")            //时区区间偏移值
                //.extendedBounds(new LongBounds(time.get(0), time.get(1)))//指定时间字段
                .subAggregation(filterAgg);

        // 3. 创建 NativeSearchQuery 进行查询

        NativeSearchQuery searchQuery = new NativeSearchQueryBuilder()
                .withQuery(myquery)
                .addAggregation(dateHistogramAggBuilder)
                .withMaxResults(0)
                .build();
        SearchHits<DeviceRawLog> searchHits = esTemplate.search(searchQuery, DeviceRawLog.class);

        // 4. 获取结果

        ChartsDataset dataset = new ChartsDataset();
        dataset.getDimensions().add("name");

        ParsedDateHistogram dateHistogram = searchHits.getAggregations().get("myHistogram");
        for (Histogram.Bucket agg1Bucket : dateHistogram.getBuckets()) {
            String dateKey = agg1Bucket.getKeyAsString();
            long dateCount = agg1Bucket.getDocCount();

            List<Object> arr = new ArrayList<>();
            arr.add(dateKey);

            if (type.equals(ChartsTypeEnum.PIE)) {
                dataset.getDimensions().add("value");
                arr.add(dateCount);
            }

            if (type.equals(ChartsTypeEnum.BAR)) {
                ParsedFilters parsedFilters = agg1Bucket.getAggregations().get("subAgg");
                for (Filters.Bucket bucket : parsedFilters.getBuckets()) {
                    String agg2Key = bucket.getKeyAsString();
                    long agg2Count = bucket.getDocCount();

                    dataset.getDimensions().add(agg2Key);
                    arr.add(agg2Count);

                    ChartsBarSeries barSeries = new ChartsBarSeries(agg2Key, new ChartsBarEncode("name", agg2Key));
                    dataset.getBarSeries().add(barSeries);
                }
            }

            dataset.getSource().add(arr);
        }

        return dataset;
    }
索引
创建索引
往 ES 创建一条数据,会自动生成索引,但这一般并不是我们想要的配置。我们想自己设定分片数,为字段规划类型、分词器等就需要自己来创建索引。
analyzer:插入文档时,将text类型的字段做分词然后插入倒排索引。
search_analyzer:查询时,先对要查询的text类型的输入做分词,再去倒排索引中搜索。
如果想要让’索引’和’查询’时使用不同的分词器也是能支持的,只需要在字段上加search_analyzer参数,索引时,只会去看字段有没有定义analyzer,有定义的话就用定义的,没定义就用es预设的。
查询时,会先去看字段有没有定义search_analyzer,如果没有定义,就去看有没有analyzer,再没有定义,才会去使用es预设的。
(1)通过建模创建索引:
@Data
@Document(indexName = INDEX_PREFIX + "style", createIndex = true)  //createIndex表示是否在 repository 引导时就创建索引
public class EsStyle extends ESBaseEntity {
    @Field(index = false, type = FieldType.Keyword)
    private String uuid;

    // 若不设 searchAnalyzer,那么搜索时会用 analyzer 上指定的分词器
    @Field(type = FieldType.Text, analyzer = "ik_max_word")
    private String name;

    @Field(index = false, type = FieldType.Nested)
    private List<EsStyleItem> items;
}
(2)通过文档实体加上 @Setting、@Mapping 创建索引:
SpringBoot 有为我们提供多种方式设置mapping,我们可以使用@Mapping注解配置,使用ES原生的方式进行设置更加直观,只需在文档实体加上 @Setting、@Mapping
@Data
@Document(indexName = "film-entity", type = "film")
@Setting(settingPath = "/json/film-setting.json")
@Mapping(mappingPath = "/json/film-mapping.json")
public class FilmEntity {
    @Id
    private Long id;
    private String name;
    private String nameOri;
    private String publishDate;
    private String type;
    private String language;
    private String fileDuration;
    private String director;
}
film-mapping.json:
{
  "film": {
    "_all": {
      "enabled": true
    },
    "properties": {
      "id": {
        "type": "integer"
      },
      "name": {
        "type": "text",
        "analyzer": "ikSearchAnalyzer",
        "search_analyzer": "ikSearchAnalyzer",
        "fields": {
          "pinyin": {
            "type": "text",
            "analyzer": "pinyinSimpleIndexAnalyzer",
            "search_analyzer": "pinyinSimpleIndexAnalyzer"
          }
        }
      },
      "nameOri": {
        "type": "text"
      },
      "publishDate": {
        "type": "text"
      },
      "type": {
        "type": "text"
      },
      "language": {
        "type": "text"
      },
      "fileDuration": {
        "type": "text"
      },
      "director": {
        "type": "text",
        "index": "true",
        "analyzer": "ikSearchAnalyzer"
      },
      "created": {
        "type": "date",
        "format": "yyyy-MM-dd HH:mm:ss||yyyy-MM-dd||epoch_millis"
      }
    }
  }
}
film-setting.json:
{
  "index": {
    "analysis": {
      "filter": {
        "edge_ngram_filter": {
          "type": "edge_ngram",
          "min_gram": 1,
          "max_gram": 50
        },
        "pinyin_simple_filter": {
          "type": "pinyin",
          "first_letter": "prefix",
          "padding_char": " ",
          "limit_first_letter_length": 50,
          "lowercase": true
        }
      },
      "char_filter": {
        "tsconvert": {
          "type": "stconvert",
          "convert_type": "t2s"
        }
      },
      "analyzer": {
        "ikSearchAnalyzer": {
          "type": "custom",
          "tokenizer": "ik_max_word",
          "char_filter": [
            "tsconvert"
          ]
        },
        "pinyinSimpleIndexAnalyzer": {
          "tokenizer": "keyword",
          "filter": [
            "pinyin_simple_filter",
            "edge_ngram_filter",
            "lowercase"
          ]
        }
      }
    }
  }
}
参考自:Elasticsearch实现中文、拼音分词、繁简体转换高级搜索
分词器
ES默认自带了很多分词器,如:Standard、english、Keyword、Whitespace等等。默认的分词器为Standard,通过它们各自的功能可组合成你想要的分词规则。分词器具体详情可查看官网
提示:给一个字段设置多个分词器一般按拆分成多字段的方式。
字段类型
keyword: 不进行分词,直接索引,支持模糊、支持精确匹配,支持聚合、排序操作。
偷个懒网上介绍字段类型的很多,直接移步:字段类型
ip:IP类型的字段,在搜索时,格式必须是IP格式(如:192.168.1.0、192.168.1.0/24),否则查询会报错。
单字段多索引
text类型的字段,他的值会被分词,所以无法精确匹配。若既需要对一个字段进行全文检索,又要对该字段进行等值查询,此时就要为这个 text 字段用不同分词器建立多个索引。映射时可以通过 fields 进行多字段配置(使用模型 @Field 建索引时,没找到对应的方法,只能通过 FieldType.Object 来)。
fields主要使用场景:
- 对一个字段配置多个类型的 type 以应对不同的查询场景
- 对一个字段配置多个分词规则以支持多种全文检索规则
官网说明:多字段 Multi-fields 允许为不同目的以多种方式索引相同的字符串值,例如一个字段用于搜索和一个多字段用于排序和聚合,或者由不同的分析器分析相同的字符串值。
使用多个分词器的方法是:在字段的 mapping 中定义一个「multi-field」,并且对于每一个分词器定义一个子字段。例如:
PUT my_index
{
  "mappings": {
    "properties": {
      "title": {
        "type": "text",
        "fields": {
          "english": {
            "type":     "text",
            "analyzer": "english"
          },
          "keyword": {
            "type":     "keyword"
          }
        }
      }
    }
  }
}
(1)同字段多type配置:
PUT my-index-000001
{
  "mappings": {
    "properties": {
      "city": {
        "type": "text",
        "fields": {
          "raw": {
            "type":  "keyword"
          }
        }
      }
    }
  }
}
通过city.raw使用city的别名raw进行排序:
GET my-index-000001/_search
{
  "query": {
    "match": {
      "city": "york"
    }
  },
  "sort": {
    "city.raw": "asc"
  },
  "aggs": {
    "Cities": {
      "terms": {
        "field": "city.raw"
      }
    }
  }
}
(2)同字段多分词规则配置:
有些场景,我们需要一个字段,满足多套分词规则的检索。
PUT my-index-000001
{
  "mappings": {
    "properties": {
      "title": {
        "type": "text",
        "fields": {
          "english": {
            "type":     "text",
            "analyzer": "english"
          }
        }
      }
    }
  }
}
利用 multi_match 多字段匹配搜索,实现一个 title 字段(拆成 title、title.english )多种分词规则检索:
GET _search
{
  "query": {
    "multi_match": {
      "query": "quick brown foxes",
      "fields": [
        "title",
        "title.english"
      ]
    }
  }
}
近义词匹配
ES近义词匹配搜索需要用户提供一张满足相应格式的近义词表,并在创建索引时设计将该表放入settings中。近义词表的可以直接以字符串的形式写入settings中也可以放入文本文件中,由es读取。
这里暂时不再研究了,参考:https://blog.csdn.net/zy_jun/article/details/131327718
分词器
ik中文分词器
ik 的分词粒度:
- ik_max_word:会将文本做最细粒度(拆到不能再拆)的拆分,例如「中华人民共和国国歌」会被拆分为「中华人民共和国、中华人民、中华、华人、人民共和国、人民、人、民、共和国、共和、和、国国、国歌」,会穷尽各种可能的组合
- ik_smart:会将文本做最粗粒度(能一次拆分就不两次拆分)的拆分,例如「中华人民共和国国歌」会被拆分为「中华人民共和国、国歌」
参考:Elasticsearch 7.X 中文分词器 ik 使用,及词库的动态扩展
pinyin 分词器
pinyin 分词器输入中文后,生成的 token 都是拼音,输入拼音生成的 token 也是拼音。
这里我不推荐在存索引数据时使用 pinyin 分词器,这样要存多少,而是推荐在查询时动态将 pinyin 转成中文(存储时可以用 ik 分词器),繁简转换也是这样处理。
参考:Elasticsearch 7.X 拼音分词器 pinyin 使用
Docker 中分词器插件的安装
1. 下载并解压 ik 分词器插件
(1)下载地址:https://github.com/medcl/elasticsearch-analysis-ik/releases
(1)创建 plugins 目录:mkdir -p ./plugins/plugins
(2)解压命令:unzip -o ./plugins/elasticsearch-analysis-ik-*.zip -d ./plugins/plugins/ik > /dev/null

2. 下载并解压 pinyin 分词器
(1)下载地址:https://github.com/medcl/elasticsearch-analysis-pinyin/releases
(2)解压命令:unzip -o ./plugins/elasticsearch-analysis-pinyin-*.zip -d ./plugins/plugins/pinyin > /dev/null

3. 将 plugins/plugins 目录映射到容器中
(1)修改 elasticsearch.yaml,添加映射:"/root/snlc/search/plugins/plugins:/usr/share/elasticsearch/plugins"
(2)启动 elasticsearch 容器

4. 查看安装成功的插件列表
docker exec -it $(docker container ls | grep 'elasticsearch' | awk '{print $1}') bash -c './bin/elasticsearch-plugin list'
输出:
-------
ik
pinyin
-------
数据流 – Data Stream
数据流可以跨多个索引存储,需要有个索引模板(index template),模板中包含映射(mappings) 和 索引设置(settings)。基于滚动索引,可按时间间隔、文档数、分片大小进行滚动。
数据流相对实体索引,有点“抽象层“的概念,其核心数据还是存储在.ds前缀的后备索引中。
数据流需要指定一个匹配的索引模板。在大多数情况下,可以使用一个或多个组件模板(component template)来组成此索引模板。通常使用单独的组件模板进行映射和索引设置。这样可以重用多个索引模板中的组件模板。
在使用数据流时,当前的数据流必须匹配一个索引模板,用于给数据流创建索引。数据流当前索引是无法被删除的,要删除必须滚动数据流,以便创建新的写入索引。然后才可使用删除索引 API 删除以前的写入索引,参考。不过可以直接删除数据流,此时数据流当前索引也被一起删除了。
Change mappings and settings for a data stream
此外经测,索引模板 mapping 字段发生变化后(比如修改分词器),数据流中数据会在 Kibina中显示不出,且新加入的数据也显示不出。删除数据流,重新加入新数据才可以展示出数据!
索引模板发生变化后,数据流的当前索引是不会变的,新创建的索引才会用变化后的模板来创建,要立即生效最快的办法就是删除数据流,此时数据流下的当前索引会一起删除!
如果新数据流或索引与多个索引模板匹配,则使用优先级最高的索引模板。
数据流特点:
- data stream 是时序索引的上层抽象。
- data stream 是模板、索引、settings、mappings、ilm policy等综合体的概念。
- data stream 相当于抛头露面的带头大哥,离不开看似隐身、默默无闻、实际埋头苦干的后备索引的支撑。
- data stream 不适合频繁删除、更新的业务场景,更适合仅追加时序数据场景。
- 只能基于 data stream 写入数据,不能基于后备索引写入数据。
- data stream 不支持单条删除或单条更新数据,只支持:update_by_query 以及 delete_by_query。
Kibana
使用Kibana 可对Elasticsearch 索引中的数据进行搜索、查看、交互操作。
(1)使用 docker run 启动
docker pull kibana:7.13.4
docker run --name kib --rm -p 5601:5601 kibana:7.13.4
(2)使用 Swarm 配置启动( mykibana.yaml)
version: '3.2'

services:
  mykibana:
    image: kibana:7.13.4
    ports:
      - "5601:5601"
    environment:
      ELASTICSEARCH_HOSTS: '["http://elasticsearch:9200"]'
    depends_on:
      - elasticsearch
    networks:
      - mynet
    deploy:
      placement:
        constraints:
          - node.labels.storm == true

networks:
  mynet:
    external:
        name: policy_mynet
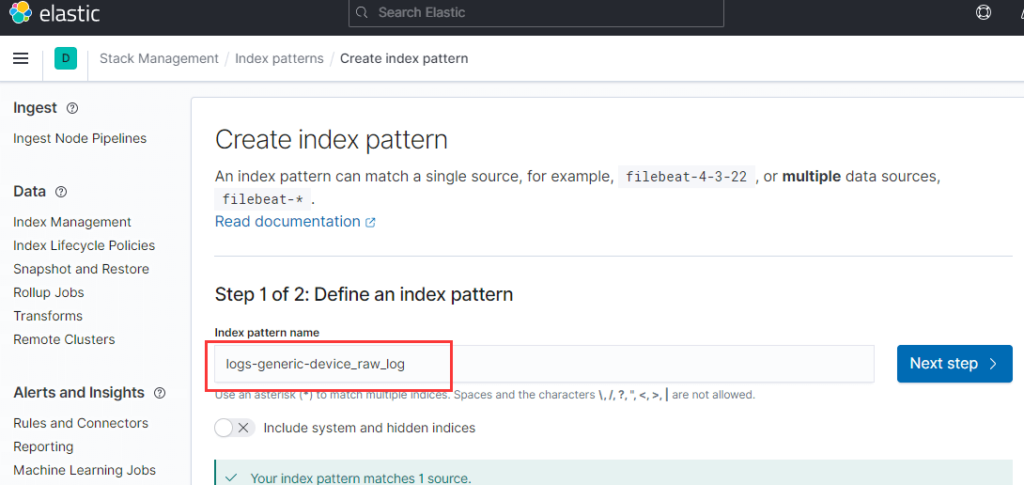
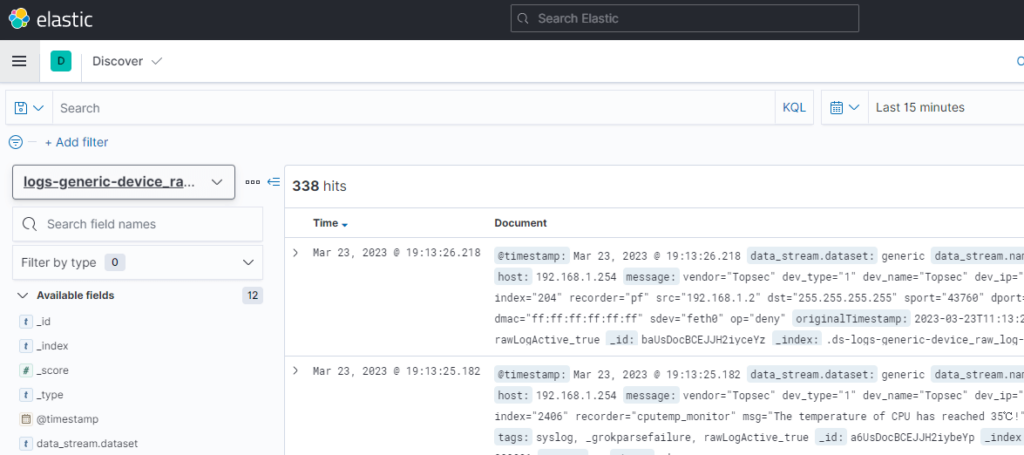
容器起来后需要先创建索引模式:


集群状态
集群黄色状态解读:
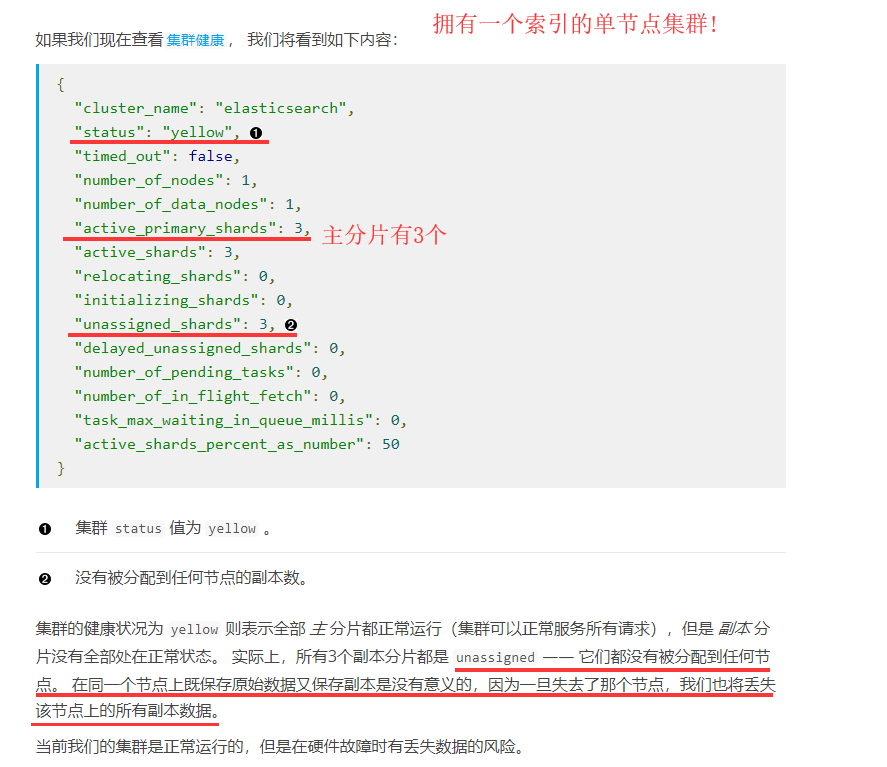
单节点 Health 为黄色,只需设置 replicas 为0 即可变绿:
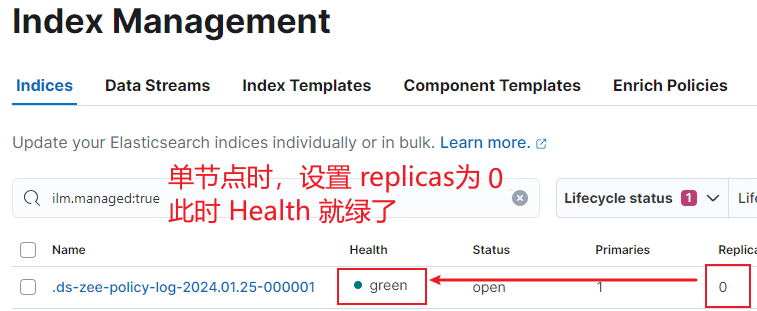
日志
Docker 方式运行的 Elasticsearch 实例,默认会输出到控制台中,日志文件位于 /var/lib/docker/containers。
bootstrap checks failed 错误解决
(1)max file descriptors [4096] for elasticsearch process is too low, increase to at least [65536]
解决办法:
第一步:切换到root用户,修改 /etc/security/limits.conf 添加如下内容:
     * soft nofile 65536
     * hard nofile 131072
     * soft nproc 4096
     * hard nproc 4096
第二步:切换到root用户,修改 /etc/security/limits.d/20-nproc.conf 添加如下内容:
     * soft nproc 1024
     #修改为
     * soft nproc 4096
(2)max number of threads [1024] for user [admin] is too low, increase to at least [4096]
解决办法和上面(1)一样。
(3) max virtual memory areas vm.max_map_count [65530] is too low, increase to at least [262144]
解决办法:
切换到root用户,修改 /etc/sysctl.conf ,添加:vm.max_map_count=655360,
并执行命令:sudo sysctl -p。
注意:如果是 docker-compose 部署,改的是宿主主机。这个设置在安装前就应该先设置。
(4)system call filters failed to install; check the logs and fix your configuration or disable system call filters at your own risk
解决办法:
修改 elasticsearch.yml,添加:
 bootstrap.memory_lock: false
 bootstrap.system_call_filter: false