CommandLineRunner
我们可以通过以下方法运行自己的初始代码:
- @PostConstruct注解
- ApplicationReadyEvent事件
- CommandLineRunner/ApplicationRunner接口
Spring Boot提供了两个接口:CommandLineRunner、ApplicationRunner,用于启动应用时做特殊处理,这些代码会在SpringApplication的run()方法运行完成之前被执行。通常用于应用启动前的特殊代码执行、特殊数据加载、垃圾数据清理、微服务的服务发现注册、系统启动成功后的通知等。相当于Spring的ApplicationListener、Servlet的ServletContextListener。CommandLineRunner 和 ApplicationRunner 的区别是run()方法的参数不同,也可以两个接口同时实现,但是没有必要。
ApplicationStartup.java
@Component
public class ApplicationStartup implements CommandLineRunner {
    private static final Logger logger = LoggerFactory.getLogger(ApplicationStartup.class);

    @Override
    public void run(String... args) throws Exception {
        logger.info("Application started with command-line arguments: {} . \n To kill this application, press Ctrl + C.", Arrays.toString(args));
    }
}
多环境配置
1 可选方案
在实际开发过程中,一般需要dev、prod、test三个环境,解决方案主要有:
- 使用 maven profile,在 pom.xml 里配置多个环境。这种方式会事先设置好所有环境,缺点就是每次也需要手动指定环境。打包时需要提前用 -P指定要打的环境。
- 使用 SpringBoot的 spring.profiles.active,这种方式,打包时不需要指定环境,运行时可以通过修改 spring.profiles.active值来切换环境,如:
java -jar test.jar --spring.profiles.active=dev
这里我推荐并讲解第二种,因为这种方式打包时不需要事先指定环境,使用时指定就好了,比较方便灵活。尤其是当我们的应用部署在 docker 中时,比如我们要将默认安装后的host值从 127.0.0.1改为具体的IP,以便外网可以访问。此时就不能用maven profile方式了。
spring boot允许你通过命名约定按照一定的格式application-{profile}.properties来定义多个配置文件,然后在 application.properties 文件中通过spring.profiles.active来激活一个或多个配置文件,如果没有指定任何profile的配置文件的话,spring boot默认会启动application-default.properties。spring boot 2.x中,profile的配置文件可以按照 application.properyies的放置位置一样,放于以下四个位置,不需要设置spring.config.location
- 当前目录的 “/config”的子目录下
- 当前目录下
- classpath根目录的“/config”包下
- classpath的根目录下
具体实现代码在 ConfigFileApplicationListener 类中。
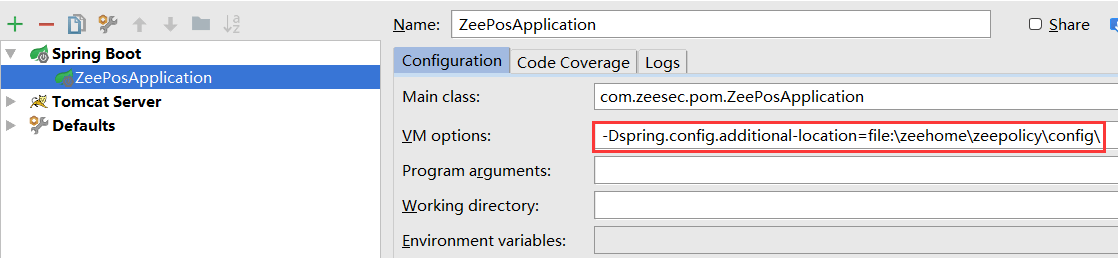
SpringBoot方式启动时,如果需要从其他地方读取配置文件,而不是默认上面四个地方,可以在IDEA 的 VM options 中添加:
-Dspring.config.additional-location=file:\falhome\falpolicy\config\,如图:
2 通过在配置文件或java option中设置 spring.profiles.active 来指定环境
application.properties
# Spring Boot Default Config
# 我们可以将不同环境都共同的配置信息写到这个文件中。

# 当前项目默认环境为 dev,即项目启动时如果不指定任何环境,Spring Boot 会自动从 dev 环境文件中读取配置信息。
# 项目启动时,改用其他环境,如:java -jar test.jar --spring.profiles.active=prod。
# 如果 dev配置中含有"wanghua.appName",那么此默认配置上的"wanghua.appName"不会起作用。
spring.profiles.active=dev

wanghua.appName="DefaultApp"
application-dev.properties
# Spring Boot Dev Config

wanghua.appName="DevApp"
application-prod.properties
# Spring Boot Prod Config

wanghua.appName="ProdApp"
ProfileServiceImpl.class
@Service
public class ProfileServiceImpl implements ProfileService {

    @Value("${wanghua.appName}")
    private String appName;

    @PostConstruct
    private void initInstance() {
        showAppName();
    }

    @Override
    public void showAppName() {
        System.out.println(">>> " + appName);
    }
}
3 使用@Profile 控制Bean实例是否创建
某些情况下,应用的某些业务逻辑可能需要有不同的实现。例如邮件服务,假设EmailService中包含的send(String email)方法向指定地址发送电子邮件,但是我们仅仅希望在生产环境中才执行真正发送邮件的代码,而开发环境里则不发送以免向用户发送无意义的垃圾邮件。我们可以借助@Profile实现这样的功能,这需要定义两个实现EmailService接口的类,且Controller层使用接口来调用send方法,而不是实现类。
DevEmailServiceImpl
@Service
@Profile("dev")
public class DevEmailServiceImpl implements EmailService {

    @PostConstruct
    private void initInstance() {
        send();
    }

    @Override
    public void send() {
        System.out.println(">> Send email for dev.");
    }
}
ProdEmailServiceImpl
@Service
@Profile("prod")
public class ProdEmailServiceImpl implements EmailService {

    @PostConstruct
    private void initInstance() {
        send();
    }

    @Override
    public void send() {
        System.out.println(">> Send email for prod.");
    }
}
执行命令查看效果:java -jar test.jar --spring.profiles.active=prod
常用注解
1 @SpringBootApplication
Spring Boot 支持 main 方法启动,在我们需要启动的主类中加入此注解,告诉 Spring Boot,这个类是程序的入口。查看源码,可以看到这个注解包含了下面三个注解:
@SpringBootConfiguration
@EnableAutoConfiguration
@ComponentScan(excludeFilters = {
        @Filter(type = FilterType.CUSTOM, classes = TypeExcludeFilter.class),
        @Filter(type = FilterType.CUSTOM, classes = AutoConfigurationExcludeFilter.class) })
SpringBootConfiguration 表示 Spring Boot 的配置注解;
EnableAutoConfiguration 表示自动配置;
ComponentScan 表示 Spring Boot 扫描 Bean 的规则,比如扫描哪些包。可以通过 basePakcages 来指定其扫描的范围,如果不指定,则默认从标注了 @ComponentScan 注解的类所在包开始扫描。因此,Spring Boot 的启动类最好放在 root package 下面,因为默认不指定 basePackages,这样能保证扫描到所有包。
2 @Configuration
加入了这个注解的类被认为是 Spring Boot 的配置类,我们知道可以在 application.yml 设置一些配置,也可以通过代码设置配置。如果我们要通过代码设置配置,就必须在这个类上标注 Configuration 注解。如下代码:
@Configuration
public class WebConfig extends WebMvcConfigurationSupport{

    @Override
    protected void addInterceptors(InterceptorRegistry registry) {
        super.addInterceptors(registry);
        registry.addInterceptor(new ApiInterceptor());
    }
}
不过 Spring Boot 官方推荐 Spring Boot 项目用 SpringBootConfiguration 来代替 Configuration。
3 @Bean
这个注解是方法级别上的注解,主要添加在 @Configuration 或 @SpringBootConfiguration 注解的类,有时也可以添加在 @Component 注解的类。它的作用是定义一个Bean。
@Bean
public ApiInterceptor interceptor(){
    return new ApiInterceptor();
}
使用@bean创建的bean只会出现一个,即使在多个Configuration中定义了 。
SpringBoot 内置的 Configuration,有的通过@ConditionalOnProperty来控制Configuration是否生效,比如: MailSenderPropertiesConfiguration 类上就有此注解。
@ConditionalOnMissingBean 仅当 BeanFactory 中不包含指定的 bean class 和/或 name 时条件匹配,该条件只能匹配到目前为止 application context 已经处理的 bean 定义,
因此强烈建议仅在自动配置类上使用此条件。
4 @Value
通常情况下,我们需要定义一些全局变量,都会想到的方法是定义一个 public static 变量,在需要时调用,是否有其他更好的方案呢?答案是肯定的,就是将这些变量写在配置里,而后使用 @Value 取出来,如:(“${server.port}”)。
它的好处不言而喻:
- 定义在配置文件里,变量发生变化,无需修改代码。
- 变量交给Spring来管理,性能更好。
5 @DependsOn
SpringBoot 中可以使用@DependsOn来控制 @Configuration注解的类中的 @Bean的顺序。
这个 @DependsOn可以设置在@Configuration类上,也可以设置在 @Bean 方法上。
注意:经测试,@Order 在 SpringBoot中不起作用的!
6 @ConfigurationProperties 与 @PropertySource
@Data
@Validated
@Configuration
@ConfigurationProperties(prefix = "wsl.swagger2")
//@PropertySource("classpath:application.properties")
public class Swagger2Properties {
    private String basePackage;
    private boolean enable;
    private String title;
    private String version;
}
这里只是需要注意一点,如果将配置写在 application.properties 中,那么这个类根据不需要设置 @PropertySource,如果设置,
那么必须加上“classpath”,否则SPringBoot打包war部署到tomcat出现错误:Could not open ServletContext resource [/application.properties],但是在开发测试时不会报错的,因为部署到Tomcat后默认的访问路劲是classpath。
拦截器 Interceptor
我们经常需要对 API 进行统一的拦截,比如进行接口的安全性校验,此时可以在SpringBoot中使用Servlet的拦截器。
TestFilter.class
import org.slf4j.Logger;
import org.slf4j.LoggerFactory;
import org.springframework.web.servlet.ModelAndView;
import org.springframework.web.servlet.handler.HandlerInterceptorAdapter;

import javax.servlet.http.HttpServletRequest;
import javax.servlet.http.HttpServletResponse;

public class TestFilter extends HandlerInterceptorAdapter {
    private final Logger logger = LoggerFactory.getLogger(TestFilter.class);

    @Override
    public boolean preHandle(HttpServletRequest request, HttpServletResponse response, Object handler) throws Exception {
        logger.info("request 请求地址 path[{}] uri[{}]", request.getServletPath(), request.getRequestURI());

        //request.getHeader(String) 从请求头中获取数据
        String userId = request.getHeader("H-User-Token");
        if (checkAuth(userId, request.getRequestURI())) {
            return true;
        }

        //实际项目中可能会抛出 HttpStatus 401
        return false;
    }


    //校验用户访问权限
    private boolean checkAuth(String userId, String requestURI) {
        return true;
    }

    @Override
    public void postHandle(HttpServletRequest request, HttpServletResponse response, Object handler, ModelAndView modelAndView) throws Exception {
    }

    @Override
    public void afterCompletion(HttpServletRequest request, HttpServletResponse response, Object handler, Exception ex) throws Exception {
    }
}
注意:HandlerInterceptorAdapter继承自HandlerInterceptor接口。其实这里并不需要适配器版本,直接用HandlerInterceptor接口就好了,只是想让大家了解下,还有这么一个适配器拦截器呢。
TestConfiguration.class
package com.wanghua.study.configuration;

import com.wanghua.study.Interceptor.ApiInterceptor;
import org.springframework.boot.SpringBootConfiguration;
import org.springframework.web.servlet.config.annotation.InterceptorRegistry;
import org.springframework.web.servlet.config.annotation.WebMvcConfigurationSupport;

@SpringBootConfiguration
public class TestConfiguration extends WebMvcConfigurationSupport {

    @Override
    protected void addInterceptors(InterceptorRegistry registry) {
        super.addInterceptors(registry);
        // 添加自定义拦截器
        registry.addInterceptor(new ApiInterceptor());
    }
}
异常处理
1 使用 @ControllerAdvice + @ExceptionHandler + @ResponseStatus(推荐)
- @ControllerAdvice是一个@Component,用于定义@ExceptionHandler,@InitBinder和@ModelAttribute方法,适用于所有使用@RequestMapping方法。
- Spring4之前,@ControllerAdvice在同一调度的Servlet中协助所有控制器。Spring4已经改变:@ControllerAdvice支持配置控制器的子集,而默认的行为仍然可以利用。
- 在Spring4中,@ControllerAdvice通过annotations(), basePackageClasses(), basePackages()方法定制用于选择控制器子集。
不过据经验之谈,只有配合@ExceptionHandler最有用,其它两个不常用。
如果单使用@ExceptionHandler和@ResponseStatus,只能在当前Controller中处理异常。但当配合@ControllerAdvice一起使用的时候,就可以摆脱那个限制了。
@ControllerAdvice
public class FalExceptionControllerAdvice {
    @ResponseBody
    @ExceptionHandler(value = FalRuntimeException.class)
    public JsonWrapper FalRuntimeExceptionHandler(Exception ex) {
        FalRuntimeException falEx = (FalRuntimeException) ex;
        FalError FalError = falEx.getFalError();
        String userMessage = null;

        if (StringUtils.isBlank(userMessage)) {
            userMessage = falEx.getMessage();
        }

        JsonWrapper jsonWrapper = JsonWrapper.createErrorResponse(null, HttpStatus.OK.toString(), userMessage, ex);
        ex.printStackTrace();
        return jsonWrapper;
    }

    @ResponseBody
    @ExceptionHandler(value = UnauthorizedException.class)
    @ResponseStatus(HttpStatus.UNAUTHORIZED)
    public JsonWrapper unauthorizedExceptionHandler(Exception ex) {
        String message = "You does not have permission.";
        // String message = ex.getMessage();
        JsonWrapper jsonWrapper = JsonWrapper.createErrorResponse(null, HttpStatus.UNAUTHORIZED.toString(), message, ex);
        ex.printStackTrace();
        return jsonWrapper;
    }

    // 如果是其他异常,则在这里捕捉处理
    @ResponseBody
    @ExceptionHandler(value = Throwable.class)
    public JsonWrapper exceptionHandler(Exception ex) {
        String message = ex.getMessage();
        JsonWrapper jsonWrapper = JsonWrapper.createErrorResponse(null, HttpStatus.OK.toString(), message, ex);
        ex.printStackTrace();
        return jsonWrapper;
    }
}
2 使用 Spring AOP
首先需要添加下面依赖:
<dependency>
    <groupId>org.springframework.boot</groupId>
    <artifactId>spring-boot-starter-aop</artifactId>
</dependency>
WebExceptionAspect.class
package com.wanghua.study.aspect;

import org.aspectj.lang.JoinPoint;
import org.aspectj.lang.annotation.*;
import org.slf4j.Logger;
import org.slf4j.LoggerFactory;
import org.springframework.stereotype.Component;
import org.springframework.web.context.request.RequestContextHolder;
import org.springframework.web.context.request.ServletRequestAttributes;

import javax.servlet.http.HttpServletResponse;
import java.io.IOException;
import java.io.PrintWriter;

@Aspect
@Component
public class WebExceptionAspect {
    private static final Logger logger = LoggerFactory.getLogger(WebExceptionAspect.class);

    /*
       若我们想统计请求的处理时间,就需要在doBefore处记录时间,并在doAfterReturning处通过当前时间与开始处记录的时间计算得到请求处理的消耗时间。
       我们可以在WebExceptionAspect切面中定义一个成员变量来给doBefore和doAfterReturning一起访问,但得考虑同步问题,所以我们可以引入ThreadLocal对象。
    */
    private ThreadLocal<Long> startTime = new ThreadLocal<>();

    // 凡是注解了 RequestMapping的方法都被拦截
    @Pointcut("@annotation(org.springframework.web.bind.annotation.RequestMapping)")
    private void webPointcut() {
    }

    // 拦截web层异常,并返回友好信息到前端 目前只拦截Exception
    @AfterThrowing(pointcut = "webPointcut()", throwing = "e")
    public void handleThrowing(Exception e) {
        e.printStackTrace();
        //logger.error(JSON.toJSONString(e.getStackTrace()));

        //这里输入友好性信息
        writeContent("服务器出现异常");
    }

    // 将内容输出到浏览器
    private void writeContent(String content) {
        HttpServletResponse response = ((ServletRequestAttributes) RequestContextHolder.getRequestAttributes()).getResponse();
        response.reset();
        response.setCharacterEncoding("UTF-8");
        response.setHeader("Content-Type", "text/plain;charset=UTF-8");
        response.setHeader("icop-content-type", "exception");
        PrintWriter writer = null;
        try {
            writer = response.getWriter();
        } catch (IOException e) {
            e.printStackTrace();
        }
        writer.print(content);
        writer.flush();
        writer.close();
    }

    @Before("webPointcut()")
    public void doBefore(JoinPoint joinPoint) throws Throwable {
        startTime.set(System.currentTimeMillis());
    }

    @AfterReturning(returning = "ret", pointcut = "webPointcut()")
    public void doAfterReturning(Object ret) throws Throwable {
        logger.info(">>> spend time: " + (System.currentTimeMillis() - startTime.get()));
    }
}
使用 BindingResult 合法性校验
在 controller 的方法需要校验的参数后面跟 BindingResult 就可以进行校验。
@RequestMapping(method = {RequestMethod.POST})
public JsonWrapper insert(@RequestBody @Valid ScheduleObjectDto scheduleObjectDto, BindingResult result)
        throws Exception {
    ValidationUtil.validateFieldErrors(result);

    ScheduleObject scheduleObject = posScheduleObjectService.saveScheduleObject(scheduleObjectDto);
    return new JsonWrapper(scheduleObject);
}
public class ValidationUtil {
    public static void validateFieldErrors(BindingResult bindingResult) throws FalUserParameterException {
        StringBuilder sb = new StringBuilder();
        if (bindingResult.hasErrors()) {
            for (ObjectError objectError : bindingResult.getAllErrors()) {
                FieldError fieldError = ((FieldError) objectError);
                sb.append(MessageFormat.format("{0} {1}!", fieldError.getField(), fieldError.getDefaultMessage()));
                break;  //仅返回一个
            }
            throw new FalUserParameterException(sb.toString());  //由@ControllerAdvice所在类统一捕捉
        }
    }
}
推荐使用 捕捉MethodArgumentNotValidException 方式。
接口版本控制
一个系统上线后会不断迭代更新,需求也会不断变化,有可能接口的参数也会发生变化,如果在原有的参数上直接修改,可能会影响线上系统的正常运行,这时我们就需要设置不同的版本,在新的版本上修改,由于老版本没有变化,因此不会影响上线系统的运行。
package com.wanghua.study.controller;

import com.alibaba.fastjson.JSONObject;
import org.springframework.stereotype.Controller;
import org.springframework.web.bind.annotation.RequestMapping;
import org.springframework.web.bind.annotation.RequestMethod;
import org.springframework.web.bind.annotation.ResponseBody;

@RequestMapping({"/{version:v0}/helloworld"})
@Controller
public class HelloWorldController {
    @RequestMapping(method = {RequestMethod.GET}, produces = {"application/json"})
    @ResponseBody
    public Object helloWorld() {
        JSONObject jsonObject = new JSONObject();
        jsonObject.put("message", "helloworld");
        return jsonObject;
    }
}
请求格式如:http://localhost:8080/v0/helloworld,这里的v0就是我们指定的版本。
如果增加了一个版本,则创建一个新的 Controller,方法名一致,version 设置为v1即可。
自定义 JSON 解析
SpringMvc中对象的序列化和反序列化,默认都使用Jackson,本节我们将 JSON 引擎替换为 fastJSON。首先得加入依赖:
<dependency>
    <groupId>com.alibaba</groupId>
    <artifactId>fastjson</artifactId>
    <version>1.2.54</version>
</dependency>
然后,在 WebConfig 类重写 configureMessageConverters 方法:
@SpringBootConfiguration
public class WebConfiguration extends WebMvcConfigurationSupport {

    @Override
    protected void addInterceptors(InterceptorRegistry registry) {
        super.addInterceptors(registry);
        registry.addInterceptor(new ApiInterceptor()); // 添加自定义拦截器
    }

    @Override
    public void configureMessageConverters(List<HttpMessageConverter<?>> converters) {
        super.configureMessageConverters(converters);

        //1 添加配置
        FastJsonConfig fastJsonConfig = new FastJsonConfig();
        fastJsonConfig.setSerializerFeatures(SerializerFeature.PrettyFormat);

        //2 定义消息转换器
        FastJsonHttpMessageConverter fastConverter = new FastJsonHttpMessageConverter();
        fastConverter.setFastJsonConfig(fastJsonConfig);
        converters.add(fastConverter);
    }
}
模板引擎
Spring Boot 没有 webapps,更没有 web.xml,但官方集成了几种模板引擎:freemarker、thymeleaf、groovy。这里我们使用freemarker讲解。首先加入依赖:
<dependency>
    <groupId>org.springframework.boot</groupId>
    <artifactId>spring-boot-starter-freemarker</artifactId>
</dependency>
其中 static 目录用于存放静态资源,譬如:CSS、JS、HTML 等,templates 目录存放模板引擎文件,我们可以在 templates 下面创建一个文件:index.ftl(freemarker 默认后缀为 .ftl),并添加内容:
<!DOCTYPE html>
<html>
    <head>
    </head>
<body>
    <h1>${message}</h1>
</body>
</html>
然后创建 FreeMarkerController 并添加内容:
@Controller
public class FreeMarkerController {

    /*
    1. 这里不是走 HTTP + JSON 模式,使用了 @Controller 而不是先前的 @RestController。
    2. 方法返回值是 String 类型,和 application.properties 配置的 Freemarker 文件配置
       路径下的各个 *.ftl 文件名一致。这样才会准确地把数据渲染到 ftl 文件里面进行展示。
    3. 用 Model 类,向 Model 加入数据,并指定在该数据在 Freemarker 取值指定的名称。
    */

    @RequestMapping("index.html")
    public String index(Model model) {
        model.addAttribute("message", "This is my first freemarker page.");
        return "index";
    }
}