用 rufus 制作 Ubuntu U盘启动盘
家里电脑 CPU X86 架构,系统是 Windows10,下面将它换成 Ubuntu,当前下载的最新版是 ubuntu-22.04.1-desktop-amd64.iso,不同版本安装基本都一样,Ubuntu 官方下载地址。
Windows 上装好 Rufus,插入U盘,按下面设置制作启动盘:
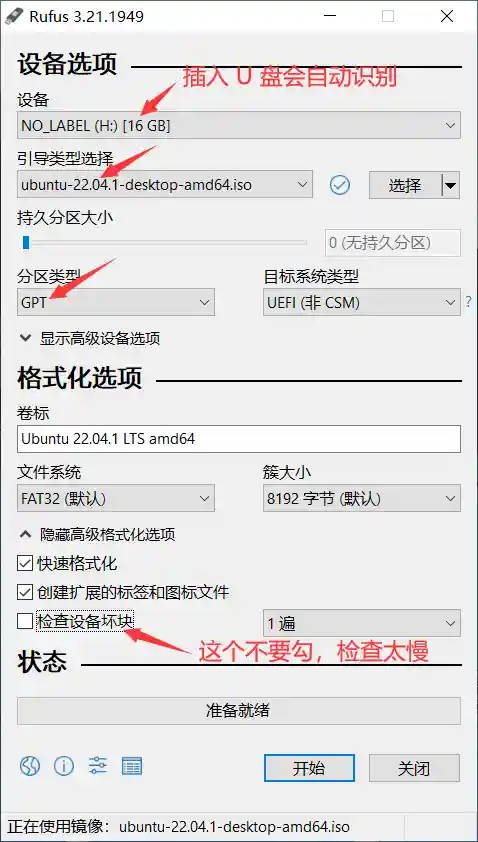
装好后,U盘被占 4 个GB,Ubuntu 22 被装在里面了,无需放 iso 镜像。
安装步骤
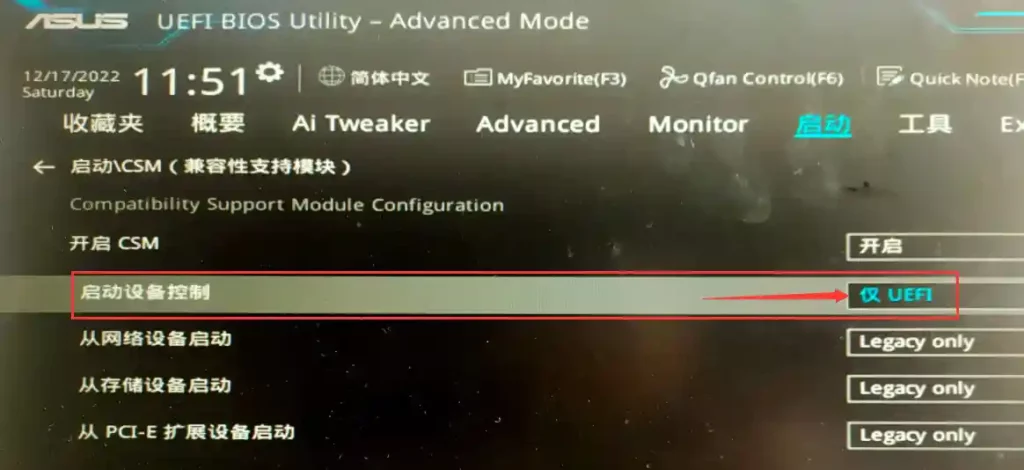
BIOS 上选择 U盘启动就不讲了,对于我的华硕主板,这里最关键的是要 开启CSM 和 选择UEFI:
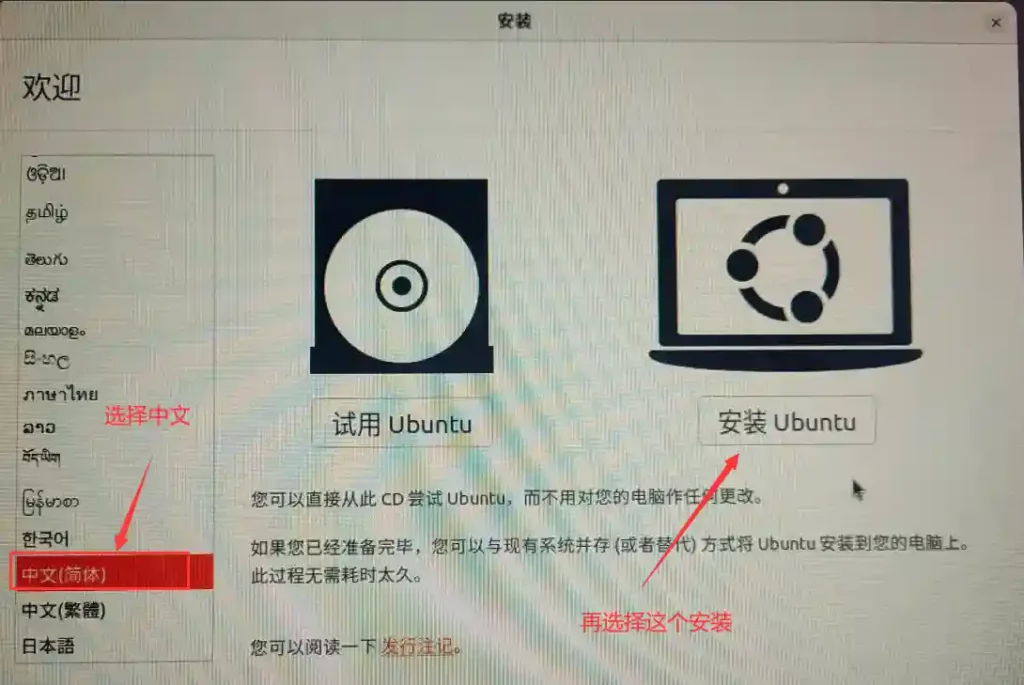
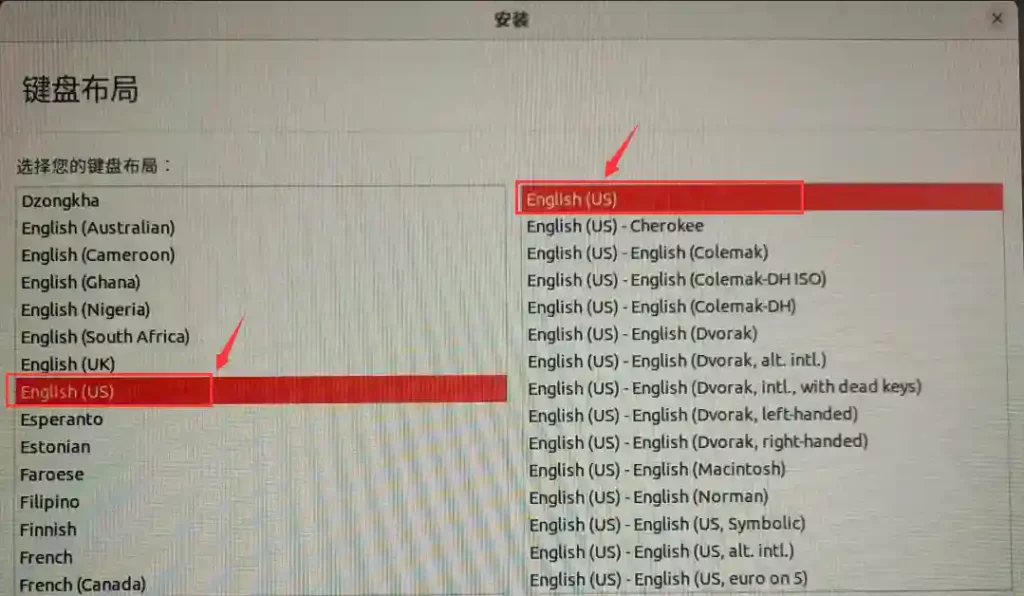
重启电脑。之后,选择 Try or Install Ubuntu 开始安装:

对于七彩虹主板,选择 Try or Install Ubuntu 后,会显示以下界面:
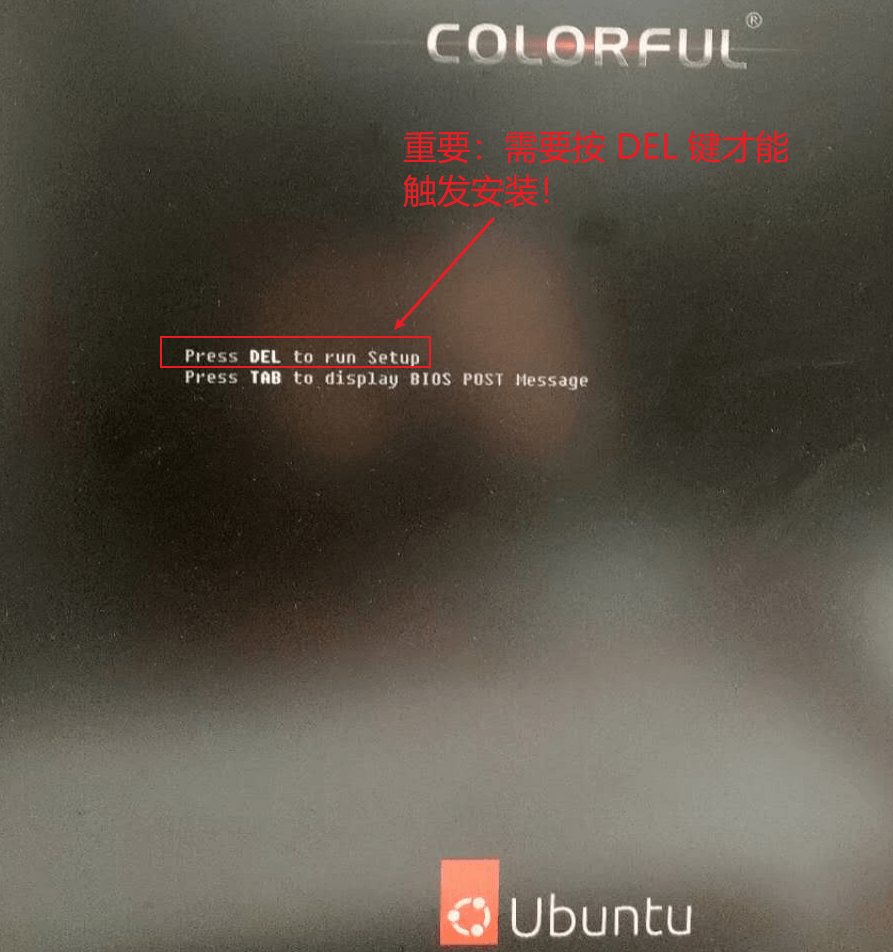
必须根据提示按 DEL 键才触发真正的安装,此时会切到命令控制台打印一堆安装的日志,大概1分钟后,出来下面的界面(华硕的好像直接进到下面的界面了):
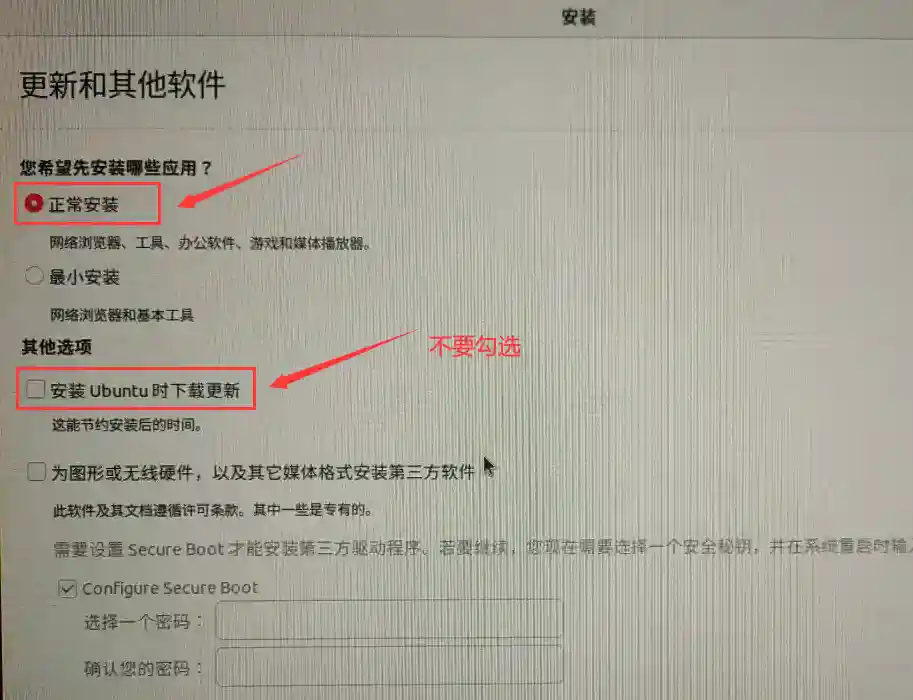
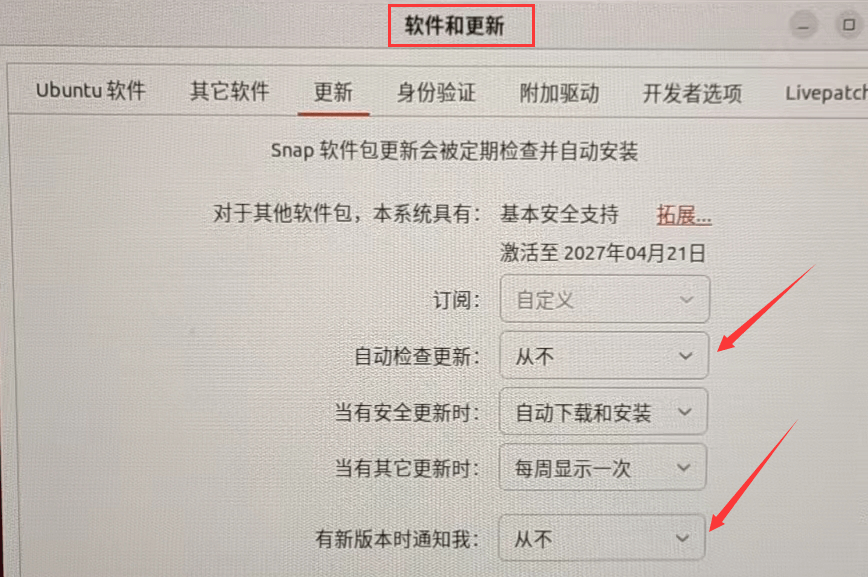
装好后,先来设置禁止自动更新:
设置国内原(可调通SSH后设置,否则拷贝内容麻烦)
先备份原来的源:
sudo cp /etc/apt/sources.list /etc/apt/sources.list.bak
接着执行 vi /etc/apt/sources.list 编辑源,依次按 :%d 三个字符清空文件,放入下面内容:
# deb cdrom:[Ubuntu 22.04 LTS _Jammy Jellyfish_ - Release amd64 (20220419)]/ jammy main restricted

# See http://help.ubuntu.com/community/UpgradeNotes for how to upgrade to
# newer versions of the distribution.
deb http://mirrors.tuna.tsinghua.edu.cn/ubuntu/ jammy main restricted
# deb-src http://cn.archive.ubuntu.com/ubuntu/ jammy main restricted

## Major bug fix updates produced after the final release of the
## distribution.
deb http://mirrors.tuna.tsinghua.edu.cn/ubuntu/ jammy-updates main restricted
# deb-src http://cn.archive.ubuntu.com/ubuntu/ jammy-updates main restricted

## N.B. software from this repository is ENTIRELY UNSUPPORTED by the Ubuntu
## team. Also, please note that software in universe WILL NOT receive any
## review or updates from the Ubuntu security team.
deb http://mirrors.tuna.tsinghua.edu.cn/ubuntu/ jammy universe
# deb-src http://cn.archive.ubuntu.com/ubuntu/ jammy universe
deb http://mirrors.tuna.tsinghua.edu.cn/ubuntu/ jammy-updates universe
# deb-src http://cn.archive.ubuntu.com/ubuntu/ jammy-updates universe

## N.B. software from this repository is ENTIRELY UNSUPPORTED by the Ubuntu
## team, and may not be under a free licence. Please satisfy yourself as to
## your rights to use the software. Also, please note that software in
## multiverse WILL NOT receive any review or updates from the Ubuntu
## security team.
deb http://mirrors.tuna.tsinghua.edu.cn/ubuntu/ jammy multiverse
# deb-src http://cn.archive.ubuntu.com/ubuntu/ jammy multiverse
deb http://mirrors.tuna.tsinghua.edu.cn/ubuntu/ jammy-updates multiverse
# deb-src http://cn.archive.ubuntu.com/ubuntu/ jammy-updates multiverse

## N.B. software from this repository may not have been tested as
## extensively as that contained in the main release, although it includes
## newer versions of some applications which may provide useful features.
## Also, please note that software in backports WILL NOT receive any review
## or updates from the Ubuntu security team.
deb http://mirrors.tuna.tsinghua.edu.cn/ubuntu/ jammy-backports main restricted universe multiverse
# deb-src http://cn.archive.ubuntu.com/ubuntu/ jammy-backports main restricted universe multiverse

deb http://mirrors.tuna.tsinghua.edu.cn/ubuntu/ jammy-security main restricted
# deb-src http://security.ubuntu.com/ubuntu jammy-security main restricted
deb http://mirrors.tuna.tsinghua.edu.cn/ubuntu/ jammy-security universe
# deb-src http://security.ubuntu.com/ubuntu jammy-security universe
deb http://mirrors.tuna.tsinghua.edu.cn/ubuntu/ jammy-security multiverse
# deb-src http://security.ubuntu.com/ubuntu jammy-security multiverse

# This system was installed using small removable media
# (e.g. netinst, live or single CD). The matching "deb cdrom"
# entries were disabled at the end of the installation process.
# For information about how to configure apt package sources,
# see the sources.list(5) manual.
接着使用命令 sudo apt update 更新源就好了。
安装 vim 编辑器
自带 vi 编辑器超级不好用,尤其是按回退等键时并不是期望的效果。
apt install -y vim
允许 root 账号登录桌面
默认 root 账号无法登录桌面的,下面来支持下,先配个 root 密码:
sudo passwd root
接下来执行 su root 切换到 root 账户下操作:
vim /etc/pam.d/gdm-autologin
找到 auth required pam_succeed_if.so user !=root quiet_success 加 # 注释,大概在第三行。
vim /etc/pam.d/gdm-password
在 auth required pam_succeed_if.so user !=root quiet_success 加 # 注释。
两处注释掉后重启电脑,就可以用 root 账号来登录桌面了。
安装 SSH 服务
# 安装 SSH 服务
apt install -y openssh-server
允许 root 账户使用 SSH:
vim /etc/ssh/sshd_config
找到 PermitRootLogin prohibit-password 注释掉,下面加一条 PermitRootLogin yes,改好后重启服务:
systemctl start sshd
生产服务器建议使用SSH公钥认证方式,具体可参考:配置 SSH 公钥认证登录
配置静态IP(可选)
对于没装可视化界面的 Ubuntu,可用下面方式配置静态IP和DNS:
# 1.查看 netplan 配置文件是否存在
ls /etc/netplan

# 2.编辑配置文件(内容请看下面截图)
vim /etc/netplan/*.yaml

# 3.应用配置(使用 try 而不是 apply 的原因是,如果配置错误导致断网,连不上,那没关系,只需要等120秒,网络配置就会自动恢复到原来的状态。)
netplan try

# 4.检查新配的静态IP是否生效(看截图)
ip addr
/etc/netplan/01-network-manager-all.yaml:
# Let NetworkManager manage all devices on this system
#network:
#  version: 2
#  renderer: NetworkManager
network:
  version: 2
  ethernets:
    enp4s0:
      addresses:
        - 192.168.3.114/24
      routes:
        - to: default
          via: 192.168.3.1
      nameservers:
        addresses:
          - 192.168.3.1
192.168.3.114/24 是 Ubuntu 的 IP 地址;via: 192.168.3.1 是网关;nameservers 下配的是 DNS,这里使用网关的;192.168.3.114/24 有时候得用 16 位的,比如在公司时,否则无法上外网。
提醒:不要在 via: 192.168.3.1 这种后面加注解(#…),否则格式错误会导致无法生效。
01-network-manager-all.yaml 用于配置第一个接口。如果您有多个接口,请使用 02-network-manager-all.yaml 作为第二个接口。Netplan 按数字顺序应用配置。这意味着 01 文件将在 02 文件之前应用。
如果你更习惯使用 Ubuntu 桌面环境的 GUI 网络管理工具,可以恢复 NetworkManager 接管网络,使用命令 vi /etc/netplan/01-network-manager-all.yaml,修改为:
network:
  version: 2
  renderer: NetworkManager
然后应用新的 Netplan 配置,并重启 NetworkManager:
sudo netplan apply
sudo systemctl restart NetworkManager
安装 Nvidia GPU 显卡驱动
# 借助下面命令查看可安装驱动
ubuntu-drivers devices

# GTX3090 会推荐装驱动 nvidia-driver-550(支持 cuda12.4.0)
sudo apt install  -y nvidia-driver-550

# 若遇"nvidia-container-cli: initialization error: nvml error: driver not loaded: unknown"很可能是显卡线没插好,我就遇到过2次,搞了好久才回过神来发现线头没插到显卡上。
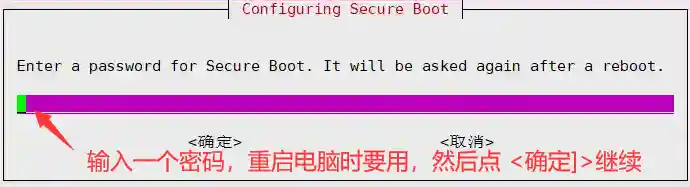
装到一半出现 UEFI Secure boot 验证机制,需要输入一个 secure boot 密码(装 GTX 3060 Ti 时没有出现这个验证机制),以便重启系统时再次输入此密码来验证固件启动的代码是可信的:

安装完显卡驱动后,需重启加载驱动,重启后出现如下图,开始不懂选了第一个 Continue boot,致新安装的 N 卡驱动没有加载,想重新选择重启电脑却再也不不出来此界面:
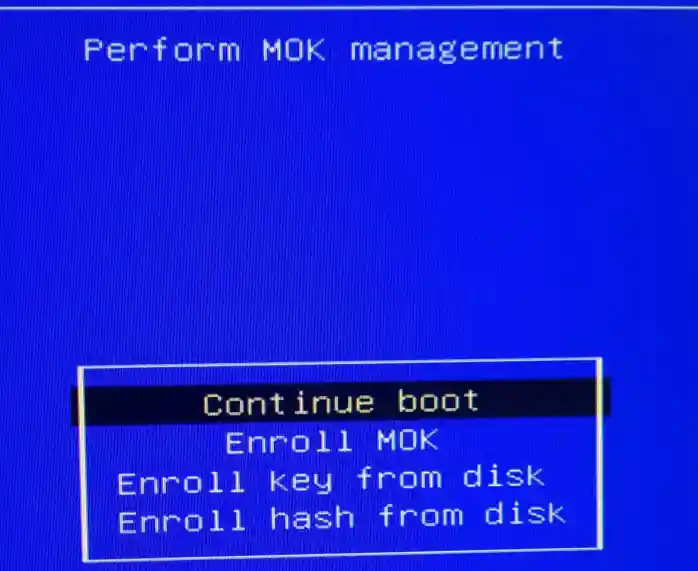
出现 perform mok management 后正确的做法是:
- 当进入蓝色背景的界面perform mok management 后,选择 enroll mok
- 进入enroll mok 界面,选择 continue
- 进入enroll the key 界面,选择 yes
- 接下来输入你在安装驱动时输入的密码
- 之后会跳到蓝色背景的界面perform mok management 选择第一个 reboot
这样,重启后N卡驱动就加载了(ubuntu下搜索软件 nvidia):
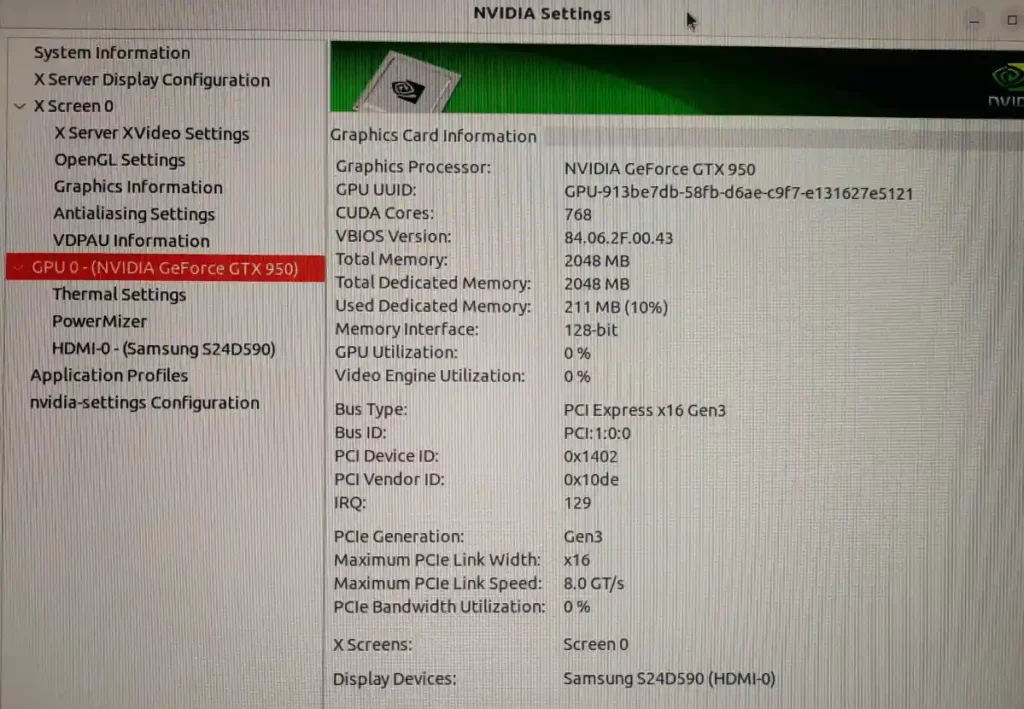
也可以用下面的命令来测试 nvidia driver 是否安装成功:
nvidia-smi
对于像我一样刚开始 perform mok management 选错的,可以通过下面方式清理驱动,然后重新安装:
# 请注意,这个命令也会卸载掉 nvidia-container-runtime,导致 docker 中无法使用 GPU,必须重新安装才行
sudo apt remove -y --purge nvidia*
sudo apt update
sudo apt install  nvidia-driver-525
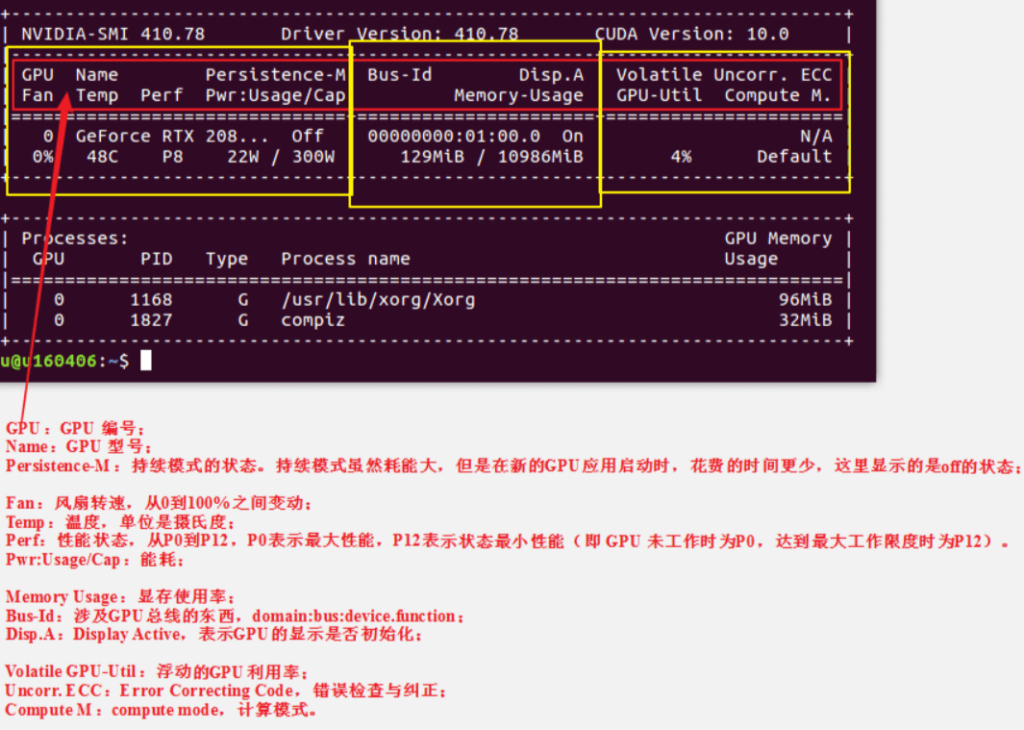
GPU 监视
# 每隔1秒更新 GPU 运行情况
watch -n 1 nvidia-smi
Docker
安装 Docker 引擎
(1)按照官方教程一步步复制命令粘贴即可:Install Docker Engine on Ubuntu 。
(2)在 2024-10-19 日使用了2个国内源安装,下载都超级慢了,因此按官方文档来离线安装。Ubuntu 22.04 的代号是 Jammy Jellyfish,对应离线安装包 jammy 目录,直达下载地址。安装命令:
sudo dpkg -i ./containerd.io_*_*.deb \
  ./docker-ce_27.3.1-1~ubuntu.22.04~jammy_amd64.deb \
  ./docker-ce-cli_*_*.deb \
  ./docker-buildx-plugin_*_*.deb \
  ./docker-compose-plugin_*_*.deb
装好后 Docker 引起已启动了,而且会开机自动启动 Docker。
# 检查 Docker 是否运行正常
systemctl status docker
接着将 Docker 默认数据目录位置 /var/lib/docker 改到 /home/xxx/service/docker,在 /etc/docker/daemon.json 中写入如下内容(文件不存在则新建):
{
    "data-root": "/home/xxx/service/docker"
}
加好后重新启动下服务:
sudo systemctl daemon-reload
sudo systemctl restart docker
# 删除旧目录
rm -rf /var/lib/docker/
安装 nvidia-container-runtime
接着我们再安装 nvidia-container-runtime 插件,以便 docker 容器中可以使用 GPU,安装过程请参考: Docker 中 GPU 的使用。
安装 docker-compose
# 安装最新版(装好后 compose 文件可能会不兼容,得更新)
apt install -y docker-compose
# 查看当前版本
docker compose version
# 卸载
sudo apt-get remove docker-compose-plugin
安全防护
(1)更改默认的 SSH 端口
在 /etc/ssh/sshd_config 中修改 Port 22 为 Port 54321 (1024-65535之间的数字)。这能阻挡 99% 的全网无差别自动端口扫描脚本。
(2)安装 Fail2Ban
线上服务器若启用 SSH 服务很容易被暴力攻击:

解决办法是装个 Fail2Ban,Fail2Ban 开箱即用:
apt install -y fail2ban && systemctl start fail2ban && systemctl enable fail2ban && systemctl status fail2ban
Fail2Ban 会扫描日志文件 /var/log/auth.log 并禁止登录尝试失败次数过多的 IP 地址。它通过更新系统防火墙规则来拒绝来自这些 IP 地址的新连接,时间可配置。Fail2Ban 开箱即用,可以读取许多标准日志文件,例如 sshd 和 Apache 的日志文件,并且可以轻松配置为读取您选择的任何日志文件,以查找您想要的任何错误。还支持发送邮件通知。
尽管 Fail2Ban 能够降低错误身份验证尝试的发生率,但它无法消除弱身份验证带来的风险。如果您确实想保护服务,请将服务设置为仅使用双因素或公/私身份验证机制。
Fail2Ban GitHub 地址:https://github.com/fail2ban/fail2ban/wiki/How-to-install-fail2ban-packages#debian–ubuntu
Dockerfile 中使用国内源
apt-get 使用国内源
# apt-get 使用阿里云源
RUN  sed -i s@/archive.ubuntu.com/@/mirrors.aliyun.com/@g /etc/apt/sources.list && apt-get clean
pip 使用国内源
对于 pip 使用国内源,可以在 pip 命令后面加 -i 参数,例如:
# 使用 -i 参数指定国内源(推荐)
pip install tensorflow==2.12.0 -i https://pypi.tuna.tsinghua.edu.cn/simple/
参考:pip 笔记
Docker 容器中使用代理下载
用github项目上的 Dockerfile 制作镜像,如 StableDiffusionWebui、Fooocus等,首次启动时会下载很多模型,由于国内被导致启动失败,实际上可以进入容器手动下载。
(1)以 fooocus 为例,首先修改 docker-compose.yml,添加 command: /bin/sh -c “sleep 36000;”,这一步的目的是让容器不挂掉,一直保持运行状态。
(2)容器起来后,运行 docker run -it –rm fooocus bash 进入容器,然后执行 export http_proxy="http://192.168.3.130:7890" && export https_proxy="http://192.168.3.130:7890" 设置代理,测试:curl https://google.com
(3)不要关闭当前shell窗口,继续执行脚本 /content/entrypoint.sh ${CMDARGS},这个命令在 Dockerfile 最后一行的 CMD 处,一旦调用此脚本,就会开始下载缺失的模型,这些模型会下载到 volumes 中持久化。
用 rsync/scp 命令内网传输
若两台 linux 用千兆线连接,推荐直接用 scp 命令在这两台电脑间传输数据,速度可达 125MB/s。
若用 Windows 电脑里的 XFTP 等工具与这两台电脑建立连接后,再可视化拖动一台中的数据到另一台,速度会非常慢只有 20MB/s,瓶颈可能是我的 Windows 电脑用的 wifi 把,暂不深入研究了。
#【linux -> linux】
scp /home/docker-image/tomcat-*.tar.gz root@192.168.3.112:/home/docker-image
Ubuntu 排错
磁盘空间不足致无法开机
先说说 Ubuntu 环境: SSD 固态硬盘 512GB,配置了60GB的系统Swap,加上模型、镜像大概 200GB,总共大概会占用50%磁盘空间。
某天开机直接卡在下图,大概说docker无法启动:
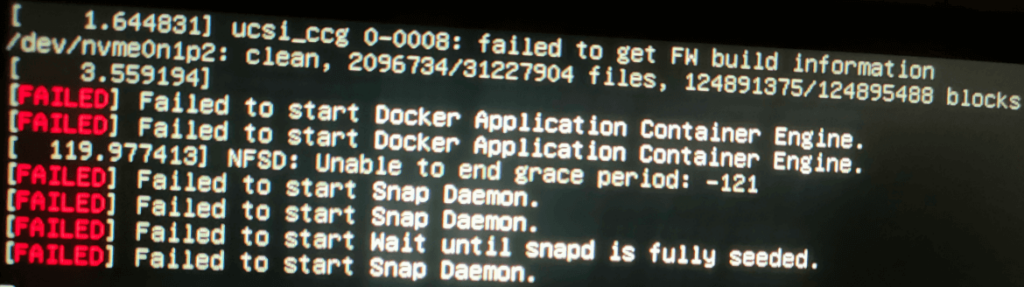
怎么办?重装系统,太费时,还是先排查下吧…….
开机长按Shift进入 Grub,选第二个高级选项:

此时会显示 Recovery Menu 菜单,我尝试用 fsck 恢复:

但报错了:No space left on device:

看到这个错,就看到了希望,回到 Recovery Menu 菜单,此时选择 root:
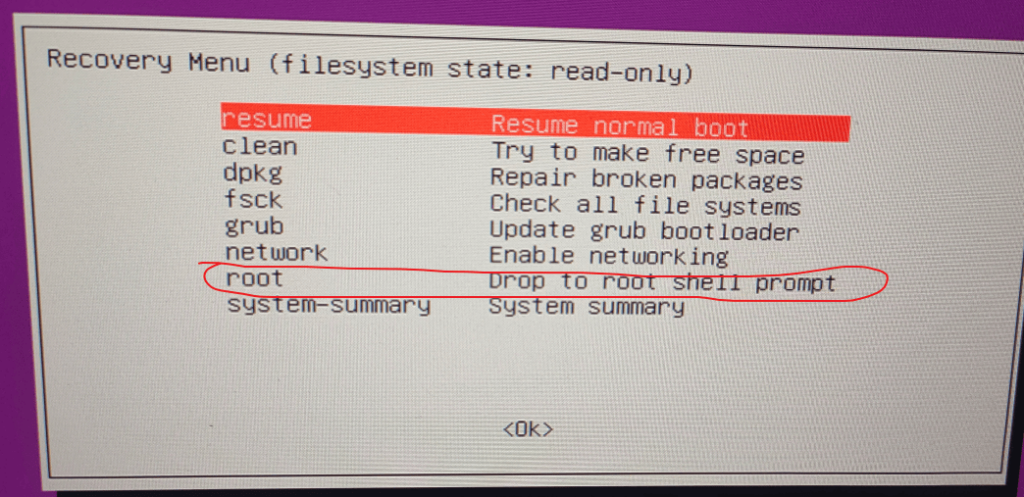
注意,在这里使用 root 命令行时要输入密码,如果密码有大写,按切换键是不会有任何提示的,包括键盘上的大写灯也不会亮起,但实际是可用的,第一次使用时,当密码输入错误,一度让我怀疑这里无法使用大写导致,实际上是自己想多。进入shell命令界面后,迫不及待打一个 df -h 看下磁盘空间,果然磁盘100%用尽:
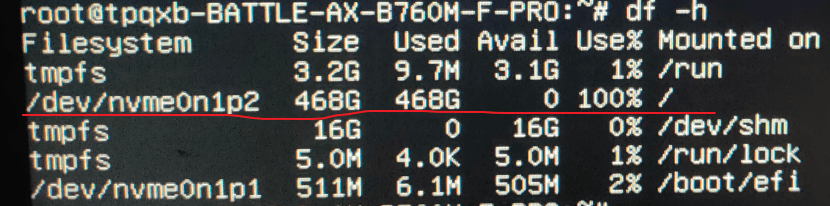
再用 du -sh * 层层目录排查,最终发现 docker overlay2 目录占用大量磁盘空间:
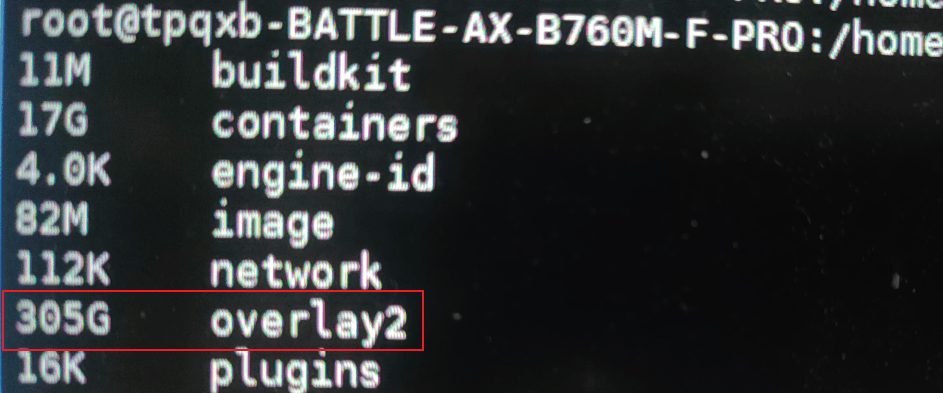
最终解决办法:执行 docker system prune 释放了120GB 磁盘空间,暂时解决了问题。
装第二块显卡,致网卡名称变化 netplan方式无法上网
华硕主板上插了第二块显卡后,有线网络无法用了,原来是网卡名称 enp4s0 变成了 enp5s0,因此需要更新 netplan 配置里的网卡名(首次遇到这个问题我是重装了 netplan,其实应该不需要,下次再遇到试试),改后要重启系统,用 netplan apply 命令不管用的。
使用 netplan 模式后,在 Ubuntu UI界面右上角是看不到有线网络的,只会显示一个网卡未托管,不要看到这个以为网络还是不通,这其实是正常的。
若不用 netplan,而是用默认的 NetworkManager 模式,不存在这个问题。
这个问题大概率是因为硬件 PCIe 拓扑变化导致网卡的 PCI 总线地址变化,系统用的持久命名规则会给它分配了一个新名字。
最后说下,我首次遇到时,还改了 高级网络配置,选择了有MAC地址的 enp5s0,默认是改签的 enp4s0:

Unable to determine the device handle for GPU0000:01:00.0: Unknown Error
主板上插了 2080ti 和 3090 两块显卡,AI满负荷运转重启没过多久又报上面的错。经测,是因为用了一拖二的线,供电不足了,换两个2080ti 就没事了(把 3090 的卸了),但是显卡温度竟达到了 86%
NVIDIA-SMI has failed because it couldn’t communicate with the NVIDIA driver. Make sure that the latest NVIDIA driver is installed and running
问题现象:容器挂掉了,执行 nvidia-smi 就爆上面的错,但是显示器能正常显示说面,执行 lspci | grep -i nvidia 查看系统显卡型号也没问题。
解决办法:卸载 nvidia-driver-525 重新装了 nvidia-driver-535 后, nvidia-smi 命令可以用了,但是执行 docker image ls 却发现之前的镜像没了。我猜这个问题是否与 docker 自动更新了什么有关!