创建虚拟环境
PyCharm 中的 Python 解释器(interpreter)可以是系统默认的 Python 解释器,也可以是虚拟环境中的 Python 解释器。在 PyCharm 中,你可以创建并管理多个虚拟环境,每个环境都可以有自己的 Python 解释器以及独立的包集合。要设置或更改项目的 Python 解释器,可以在 PyCharm 的设置或首选项对话框中找到相关选项,通常是在“Project: [project_name]”>“Python Interpreter”的路径下。这里你可以选择一个已有的虚拟环境,或者配置一个新的虚拟环境供项目使用。如果你没有特别设置,那么默认情况下 PyCharm 可能会使用全局的 Python 解释器。点击 “Python Interpreter” 右边的 “Add Interpreter” 可以添加新的虚拟环境。

安装 CUDA 11.8、torch==2.0.1
Stable Diffusion web UI 的 GitHub地址。
说明:以下命令参照制作 stable-diffusion-webui 镜像时的步骤,Python要用 3.10,否则下载第一个模型就报错:NCOMPATIBLE PYTHON VERSION,This program is tested with 3.10.6 Python, but you have 3.11.4。
由于 xformers==0.0.22 基于PyTorch 2.0.1+cu118打的,用于加速 Transformer 模型,它很对 cuda、torch版本很挑剔,因此这里我从 PyTourch 官网找了对应的版本来安装:
pip3 install torch==2.0.1 torchvision==0.15.2 torchaudio==2.0.2 --index-url https://download.pytorch.org/whl/cu118
安装 xformers(可选)
pip3 install --no-cache-dir xformers==0.0.22 --no-dependencies -i https://mirrors.aliyun.com/pypi/simple
安装其他库
pip3 install tb-nightly httpx==0.24.1 -i https://mirrors.aliyun.com/pypi/simple
pip3 install basicsr==1.4.2 -i https://pypi.tuna.tsinghua.edu.cn/simple
pip3 install -r stable-diffusion-webui-1.10.1/requirements_versions.txt -i https://pypi.tuna.tsinghua.edu.cn/simple
安装 clip
pip3 install clip
说明:在制作镜像时,我用的离线安装方式,即先下载源码,再安装。
启动
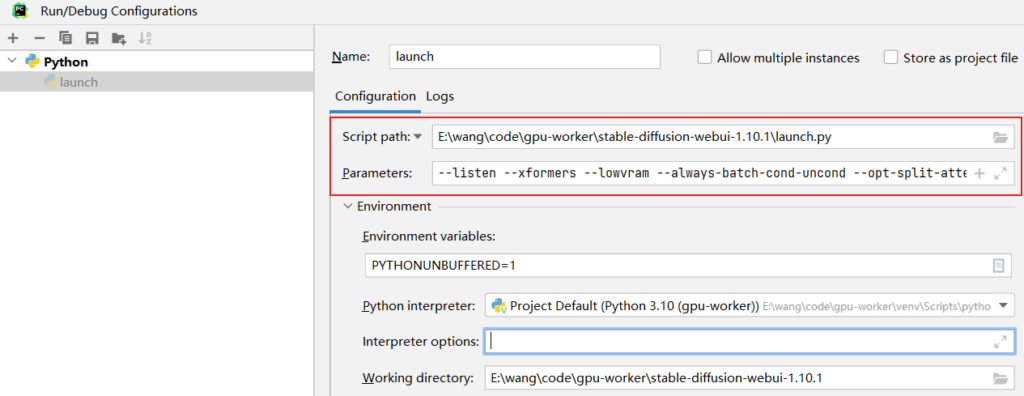
只需调试 launch.py,但要加几个参数:–listen –xformers。我的笔记本显卡是2G的,需要额外加几个参数才能不爆显存:–listen –xformers –lowvram –always-batch-cond-uncond –opt-split-attention –no-half-vae –listen –no-gradio-queue –precision full –no-half –skip-torch-cuda-test。结果如图:

实际只加 –listen –xformers –lowvram 也能正常处理图片放大任务。
结论
在做镜像前,我们也可以本地开发环境(有科学上网环境)先使用 PyCharm 调试 stable-diffusion-webui,以便自动下载模型和 repositories。做镜像时直接拿来用。但这有个前提条件:显存要高,否则来回切换模型会爆内存,导致下载模型磕磕绊绊。