1 Zipkin介绍
Zipkin 是 Twitter 的一个开源项目,官网https://zipkin.io。它致力于收集服务的定时数据,以解决微服务架构中的延迟问题,包括数据的收集、存储、查找和展现。
Zipkin 是 Twitter 开源的分布式跟踪系统,基于 Dapper 的论文设计而来。它的主要功能是收集系统的时序数据,从而追踪微服务架构的系统延时等问题。Zipkin 还提供了一个非常友好的界面,便于我们分析追踪数据。
Zipkin 提供了可插拔数据存储方式:In-Memory、MySql、Cassandra 以及 Elasticsearch。接下来的测试为方便直接采用 In-Memory 方式进行存储,生产推荐 Elasticsearch。
Zipkin 主要由 4 个核心组件构成:
- Collector:收集器组件,它主要用于处理从外部系统发送过来的跟踪信息,将这些信息转换为 Zipkin 内部处理的 Span 格式,以支持后续的存储、分析、展示等功能。
- Storage:存储组件,它主要对处理收集器接收到的跟踪信息,默认会将这些信息存储在内存中,我们也可以修改此存储策略,通过使用其他存储组件将跟踪信息存储到数据库中。
- RESTful API:API 组件,它主要用来提供外部访问接口。比如给客户端展示跟踪信息,或是外接系统访问以实现监控等。
- Web UI:UI 组件,基于 API 组件实现的上层应用。通过 UI 组件用户可以方便而有直观地查询和分析跟踪信息。
Zipkin 分为两端,一个是 Zipkin 服务端,一个是 Zipkin 客户端,客户端也就是微服务的应用。
客户端会配置服务端的 URL 地址,一旦发生服务间的调用的时候,会被配置在微服务里面的 Sleuth 的监听器监听,并生成相应的 Trace 和 Span 信息发送给服务端。
发送的方式主要有两种,一种是 HTTP 报文的方式,还有一种是消息总线的方式如 RabbitMQ。
不论哪种方式,我们都需要:
- 一个 Eureka 服务注册中心,这里我们就用之前的
eureka项目来当注册中心。 - 一个 Zipkin 服务端。
- 两个微服务应用,
trace-a和trace-b,其中trace-a中有一个 REST 接口/trace-a,调用该接口后将触发对trace-b应用的调用。
2 SpringCloudSleuth介绍
通过 SpringCloud 来构建微服务架构,我们可以通过 SpringCloudSleuth 实现分布式追踪,它集成了 Zipkin。
Sleuth 术语
- span(跨度):基本工作单元。例如,在一个新建的 span 中发送一个 RPC 等同于发送一个回应请求给 RPC,span 通过一个64位 ID 唯一标识,trace 以另一个64位 ID 表示,span 还有其他数据信息,比如摘要、时间戳事件、关键值注释(tags)、span 的 ID,以及进度 ID(通常是 IP 地址)。span 在不断的启动和停止,同时记录了时间信息,当你创建了一个 span,你必须在未来的某个时刻停止它。
- trace(追踪):一组共享“root span”的 span 组成的树状结构成为 trace。trace 也用一个64位的 ID 唯一标识,trace中的所有 span 都共享该 trace 的 ID。
- annotation(标注):用来及时记录一个事件的存在,一些核心 annotations 用来定义一个请求的开始和结束。
- cs,即 Client Sent,客户端发起一个请求,这个 annotion 描述了这个 span 的开始。
- sr,即 Server Received,服务端获得请求并准备开始处理它,如果将其 sr 减去 cs 时间戳便可得到网络延迟。
- ss,即 Server Sent,注解表明请求处理的完成(当请求返回客户端),如果 ss 减去 sr 时间戳便可得到服务端需要的处理请求时间。
- cr,即 Client Received,表明 span 的结束,客户端成功接收到服务端的回复,如果 cr 减去 cs 时间戳便可得到客户端从服务端获取回复的所有所需时间。
Spring Cloud Sleuth 有一个 Sampler 策略,可以通过这个实现类来控制采样算法。采样器不会阻碍 span 相关 id 的产生,但是会对导出以及附加事件标签的相关操作造成影响。 Sleuth 默认采样算法的实现是 Reservoir sampling,具体的实现类是 PercentageBasedSampler,默认的采样比例为: 0.1(即 10%)。
3. docker-zipkin项目
3.1 项目介绍
zipkin项目(zipkin-server)地址:点这里。
docker-zipkin项目地址:点这里。
zipkin项目是zipkin服务器的源码存放处,最终打包成zipkin.jar。docker-zipkin项目是以docker方式部署zipkin服务器。
docker-hub中以 openzipkin开头的镜像源文件都docker-zipkin项目里。若您有兴趣,这个项目里还提供了docker-machine安装用户指南。
zipkin项目和docker-zipkin项目都定义了一些环境变量,你可以适当修改docker-zipkin项目的docker-compose.yml,以满足你自己的实际需求。
3.2 可用环境变量
(1) zipkin项目 可用的环境变量
QUERY_PORT: 监听http api和web ui; 默认值 9411QUERY_ENABLED:falsedisables the query api and UI assets. Search may also be disabled for the storage backend if it is not needed; Defaults to trueSEARCH_ENABLED:falsedisables trace search requests on the storage backend. Does not disable trace by ID or dependency queries. Disable this when you use another service (such as logs) to find trace IDs; Defaults to trueQUERY_LOG_LEVEL: Log level written to the console; Defaults to INFOQUERY_LOOKBACK: How many milliseconds queries can look back from endTs; Defaults to 24 hours (two daily buckets: one for today and one for yesterday)STORAGE_TYPE: SpanStore implementation: one ofmem,mysql,cassandra,elasticsearchCOLLECTOR_SAMPLE_RATE: Percentage of traces to retain, defaults to always sample (1.0).AUTOCOMPLETE_KEYS: list of span tag keys which will be returned by the/api/v2/autocompleteTagsendpoint
除了 zipkin项目指定的环境变量,在docker中我们还可以根据docker-zipkin上说的,使用下面这些环境变量:
(2) docker-zipkin项目 可用的环境变量
JAVA_OPTS: 用于设置java参数,例如 heap size 或 trust store location.STORAGE_PORT_9042_TCP_ADDR— A Cassandra node listening on port 9042. This environment variable is typically set by linking a container runningzipkin-cassandraas “storage” when you start the container.STORAGE_PORT_3306_TCP_ADDR— A MySQL node listening on port 3306. This environment variable is typically set by linking a container runningzipkin-mysqlas “storage” when you start the container.STORAGE_PORT_9200_TCP_ADDR— An Elasticsearch node listening on port 9200. This environment variable is typically set by linking a container runningzipkin-elasticsearchas “storage” when you start the container. This is ignored whenES_HOSTSorES_AWS_DOMAINare set.KAFKA_PORT_2181_TCP_ADDR— A zookeeper node listening on port 2181. This environment variable is typically set by linking a container runningzipkin-kafkaas “kafka” when you start the container.
例如,添加一个 debug 日志,可以在 docker-compose文件中添加 JAVA_OPTS 环境变量:
- JAVA_OPTS=-Dlogging.level.zipkin=DEBUG -Dlogging.level.zipkin2=DEBUG
4 Zipkin服务端安装
4.1 简单安装
关于 Zipkin 的服务端,在使用 Spring Boot 2.x 版本后,官方就不推荐自行定制编译了,反而是直接提供了编译好的 jar 包来给我们使用。所以官方提供了一键脚本:
curl -sSL https://zipkin.io/quickstart.sh | bash -s
java -jar zipkin.jar
如果用 Docker 的话,直接使用下面的命令:
docker run -d -p 9411:9411 openzipkin/zipkin
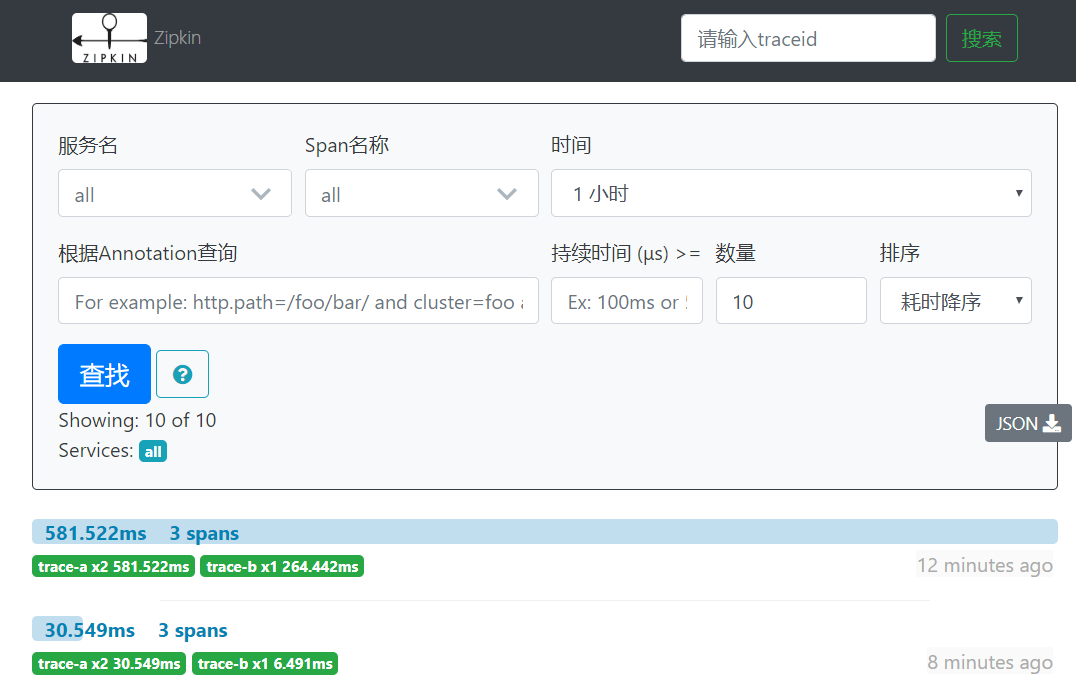
任一方式启动后,访问 http://localhost:9411/zipkin/ 就能看到如下汉化界面。请注意,最后的 /不能少。
注:默认zipkin数据是存储在内存中的,关闭服务数据就没有了,点击查看zipkin扩展。
4.2 docker-compose安装(推荐)
推荐方案:zipkin + elasticsearch+ kafka + dependencies(我的docker-zipkin)
zipkin-docker官网的 docker-compose.yml 中除了使用 zipkin和mysql(存储)镜像外,还有 dependencies、prometheus、grafana用于监控及UI显示。下面你会看到我修改了 docker-compose.yml,只使用zipkin和mysql,并升级到version 3.6。
在业务量大的情况下,http的传输效率可能会影响业务系统的性能,所以可以换成rabbitmq或kafka来传输trace数据。Spring Cloud Dalston或更低版本,是通过spring-cloud-sleuth-zipkin-stream插件来完成的,但从Edgware及更高版本,已经简化了操作,只需要引入spring-rabbitmq或spring-kafka即可。
使用kafka后不仅提高了性能,还确保当zipkin服务器挂掉重启后,挂掉期间的追踪信息还能被继续读取。
docker-zipkin项目已经很全面了,这里我借鉴这个项目。
这里kafka我使用的是以前自己的 kafka-compose.yml,而不是docker-zipkin项目里的。
这里elasticsearch我使用的是docker-zipkin项目里的docker-compose-elasticsearch.yml,只是作了点改动,这个文件覆盖默认的mysql(因为两个yml文件中的服务都用了 storage 名称)。当前docker-zipkin的elasticsearch镜像使用的elasticsearch版本为6.5.1是最新的,因此我直接使用这个项目提供的elasticsearch镜像了。
使用kafka作为搜集器,需要给zipkin设置环境变量KAFKA_BOOTSTRAP_SERVERS。
经测试,zipkin服务器一起来,kafka topic中就会有一个 zipkin。
4.2.1 docker-compose.yml
version: '3.6'

services:
  storage:
    image: openzipkin/zipkin-mysql
    ports:
      - 3306:3306

  # The zipkin process services the UI, and also exposes a POST endpoint that
  # instrumentation can send trace data to. Scribe is disabled by default.
  zipkin:
    image: openzipkin/zipkin
    # Environment settings are defined here https://github.com/openzipkin/zipkin/tree/1.19.0/zipkin-server#environment-variables
    environment:
      - STORAGE_TYPE=mysql
      # Point the zipkin at the storage backend
      - MYSQL_HOST=storage
      # Uncomment to enable scribe
      # - SCRIBE_ENABLED=true
      # Uncomment to enable self-tracing
      # - SELF_TRACING_ENABLED=true
      # Uncomment to enable debug logging
      # - JAVA_OPTS=-Dlogging.level.zipkin=DEBUG -Dlogging.level.zipkin2=DEBUG
    ports:
      # Port used for the Zipkin UI and HTTP Api
      - 9411:9411
      # Uncomment if you set SCRIBE_ENABLED=true
      # - 9410:9410
    depends_on:
      - storage

  # Adds a cron to process spans since midnight every hour, and all spans each day
  # This data is served by http://192.168.99.100:8080/dependency
  #
  # For more details, see https://github.com/openzipkin/docker-zipkin-dependencies
  dependencies:
    image: openzipkin/zipkin-dependencies
    entrypoint: crond -f
    environment:
      - STORAGE_TYPE=mysql
      - MYSQL_HOST=storage
      # Add the baked-in username and password for the zipkin-mysql image
      - MYSQL_USER=zipkin
      - MYSQL_PASS=zipkin
      # Uncomment to see dependency processing logs
      # - ZIPKIN_LOG_LEVEL=DEBUG
      # Uncomment to adjust memory used by the dependencies job
      # - JAVA_OPTS=-verbose:gc -Xms1G -Xmx1G
    depends_on:
      - storage
4.2.2 kafka-compose.yml
version: '3.6'

services:
  falzookeeper:
    image: 192.168.1.166:8083/zookeeper-falsec
    volumes:
      - "zoodata:/data"
      - "zoodatalog:/datalog"
      - "zoologs:/logs"
    ports:
      - "2181:2181"

  falkafka:
    image: 192.168.1.166:8083/kafka-falsec
    volumes:
      - "kafka:/kafka"
      - "kafka-conf:/opt/kafka/config"
    depends_on:
      - falzookeeper
    ports:
      - "9092:9092"

  falkafkamanager:
    image: hlebalbau/kafka-manager:latest
    depends_on:
      - falzookeeper
    ports:
      - "9000:9000"
    environment:
      ZK_HOSTS: "falzookeeper:2181"
      APPLICATION_SECRET: "random-secret"
    command: -Dpidfile.path=/dev/null

volumes:
  zoodata:
  zoodatalog:
  zoologs:
  kafka:
  kafka-conf:

networks:
  falnet:
    driver: overlay
    attachable: true
4.2.3 docker-compose-kafka.yml
# Extends the default configuration from docker-compose.yml to add a test
# kafka server, which is used as a span transport.

version: '3.6'

services:
  zipkin:
    environment:
      - KAFKA_BOOTSTRAP_SERVERS=192.168.1.240:9092
注:docker-zipkin项目中 docker-compose-kafka.yml 文件提供了 kafka-zookeeper镜像,这里我去掉了,改用自己的kafka-compose.yml。
4.2.4 docker-compose-elasticsearch.yml
version: '3.6'

services:
  # Run Elasticsearch instead of MySQL
  storage:
    image: openzipkin/zipkin-elasticsearch6
    ports:
       - 9200:9200

  # Switch storage type to Elasticsearch
  zipkin:
    image: openzipkin/zipkin
    environment:
      - STORAGE_TYPE=elasticsearch
      # Point the zipkin at the storage backend
      - ES_HOSTS=storage
      # Uncomment to see requests to and from elasticsearch
      # - ES_HTTP_LOGGING=BODY

  dependencies:
    environment:
      - STORAGE_TYPE=elasticsearch
      - ES_HOSTS=storage
我在centos7虚拟机上会遇到一个elasticsearch错误:max virtual memory areas vm.max_map_count [65530] is too low, increase to at least [262144]
解决办法:
将虚拟机切换到root用户,修改 /etc/sysctl.conf ,添加:
vm.max_map_count=655360
并执行命令:sudo sysctl -p
4.2.5 application.yml(微服务A)
server:
  port: 58080
spring:
  application:
    name: trace-a
  sleuth:
    web:
      client:
        enabled: true      #Enable interceptor injecting into {@link org.springframework.web.client.RestTemplate},默认就是true。
    sampler:
      probability: 1.0    #将采样比例设置为 1.0,也就是全部都需要。默认是 0.1
  zipkin:
    base-url: http://192.168.1.231:9411/ # 指定了 zipkin 服务器的地址,这里指向一个错误的地址,因为我们要改用 kafka 作为传输对象
    kafka:
      topic: zipkin
    sender:
      type: kafka
  kafka:
    bootstrap-servers: 192.168.1.230:9092
eureka:
  client:
    serviceUrl:
      defaultZone: http://localhost:8761/eureka/
4.2.6 application.yml(微服务B)
和微服务A差不多,只是 port 和 name 改下,这里不再贴出来来了。
4.2.7 启动docker-compose
以上1-4步的代码写好后,就可以启用了,启用命令如下:
$ docker-compose -f kafka-compose.yml up
$ docker-compose -f docker-compose.yml -f docker-compose-kafka.yml -f docker-compose-elasticsearch.yml up
4.2.8 效果
