CUDA
NVIDIA产品线
NVIDIA显卡三大产品线:Quadro、GeForce、Tesla,GeForce显卡定位是消费级常用来打游戏,Tesla定位并行计算,一般用于数据中心以及机器学习。
GPU与CUDA算力
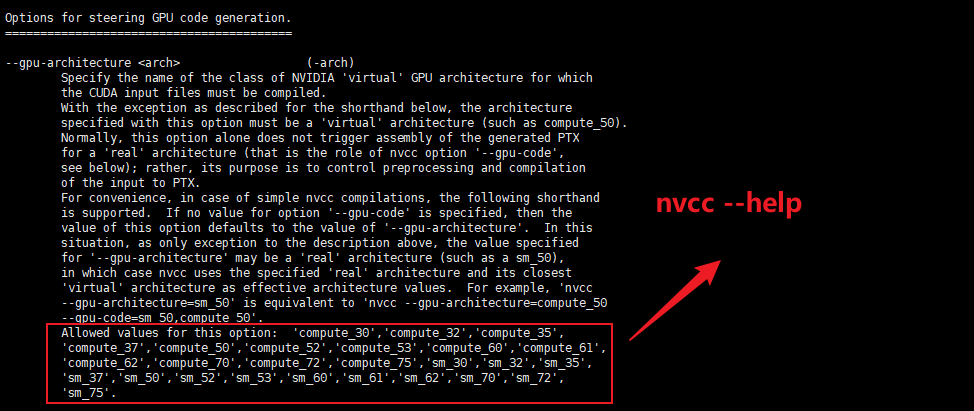
测试了 RTX3060、RTX4080 都不支持 cuda10。RTX3060 上会报错 nvcc fatal : Value ‘sm_86’ is not defined for option ‘gpu-architecture’ ,RTX4080上会报错 nvcc fatal : Value ‘sm_89’ is not defined for option ‘gpu-architecture’。其中 sm_89 意思是算力89,CUDA10.x 最高支持算力 7.x,查看算力(点击:支持 CUDA 的 NVIDIA Quadro 和 NVIDIA RTX)。
CUDA Toolkit 版本(点击下载指定版本)可以用过命令 nvcc -V 查看,Driver Version 可以通过命令 nvidia-smi 查看。其中 nvcc –help 命令还可以查看 cuda 的算力:

使用代理执行 pip install 下载任务时,尤其是下载 tensorflow、torch 这种大文件时,往往下载到一半会超时,解决办法是添加 –default-timeout=100 参数以延长默认超时时间,例如:

Ubuntu宿主机CUDA驱动与docker容器中的cuda不兼容问题
目前我的Ubuntu宿主机装的CUDA驱动,可以很好的运行基于docker基镜像 nvidia/cuda:11.8.0-base-ubuntu22.04 的容器,但基镜像升级到 nvidia/cuda:12.3.1-base-ubuntu22.04 运行容器就报下面的错:
Unexpected error from cudaGetDeviceCount(). Did you run some cuda functions before calling NumCudaDevices() that might have already set an error? Error 804: forward compatibility was attempted on non supported HW
改回到 nvidia/cuda:11.8.0-base-ubuntu22.04 来打镜像就没问题了。
参考:PyTorch的CUDA错误:Error 804: forward compatibility was attempted on non supported HW
PyTorch
pytorch 采用 python 语言接口来实现编程,而 torch 是采用 lua 语言。
python太新无法安装pytorch
python 太新会无法安装pytorch,报错信息一般是:Could not find a version that satisfies the requirement torch==x.x.x。
cuda太新无法安装pytorch
若显卡要求cuda11,那么就不能装低版本的 pytorch,否则算力不匹配会报错:
NVIDIA GeForce RTX 4080 with CUDA capability sm_89 is not compatible with the current PyTorch installation.
The current PyTorch install supports CUDA capabilities sm_37 sm_50 sm_60 sm_70.
......
......
RuntimeError: CUDA error: no kernel image is available for execution on the device
CUDA kernel errors might be asynchronously reported at some other API call,so the stacktrace below might be incorrect.
通过 torch 下载源来指定CUDA版本
要使用指定版本的 CUDA(离线包下载地址)可能不是去选择 torch 版本,而是选择用什么源来下载 torch。例如下面内容摘自官方网站,相同版本的 torch 适用于不同的 CUDA 版本,仅仅是因为下载源不同:
# CUDA 10.2
pip3 install torch==1.8.2 torchvision==0.9.2 torchaudio==0.8.2 --extra-index-url https://download.pytorch.org/whl/lts/1.8/cu102

# CUDA 11.1
pip3 install torch==1.8.2 torchvision==0.9.2 torchaudio==0.8.2 --extra-index-url https://download.pytorch.org/whl/lts/1.8/cu111
国内以上命令下载不稳定,若失败可通过打印的下载地址在浏览器中手动下载:

whl文件下载下来后直接安装:
# 离线安装 torch
python -m pip install /opt/torch-1.8.2+cu111-cp36-cp36m-linux_x86_64.whl -i https://pypi.tuna.tsinghua.edu.cn/simple -i
https://pypi.tuna.tsinghua.edu.cn/simple

# 在线安装 torchvision(速度很快)
python -m pip install torchvision==0.9.2 --extra-index-url https://download.pytorch.org/whl/lts/1.8/cu111
显卡驱动
RTX 2080ti 显卡最多装 cuda 12.4
Ubuntu-22.04上安装的稳定驱动是 nvidia-driver-550,用 nvidia-smi 显示 cuda 12.4,想升级到 nvidia-driver-570 一直报不兼容问题,因此无法安装基于 cuda 12.8 的 torch。
报错:module ‘torch’ has no attribute ‘float8_e4m3fn’
这个问题是 torch 2.0.1 版本旧导致的,升级到 2.5.1 不报错了。但是升级要选择 CUDA 11.8 的版本,下载地址:https://pytorch.org/get-started/previous-versions/
TensorFlow
tensorflow1.15 似乎是支持CUDA11的,从 Ubuntu, CUDA, TensorFlow, and TensorRT 对应版本关系 表可以看出,但实际测试时还是不行。此外,从对应关系可看到 CUDA 11.8.0 要用 ubuntu20.04,但为何 nvidia官网有 nvidia/cuda:11.8.0-cudnn8-devel-ubuntu18.04 镜像?CUDA Toolkit 对应的 Driver Version 表可点此查看。tensorflow_gpu-1.15.0 只能使用 CUDA10,点击查看。
TensorFlow1.5 对应 cuda10,但可使用第三方安装包来改用 cuda11,但仅支持 python3.6和3.8,不支持3.7的,具体案例可看 wang-styleflow 镜像的 Dockerfile:
python3.6 -m pip install nvidia-pyindex -i https://pypi.tuna.tsinghua.edu.cn/simple && \
python3.6 -m pip install nvidia-tensorflow[horovod] -i https://pypi.tuna.tsinghua.edu.cn/simple && \
python3.6 -m pip install nvidia-tensorboard==1.15 -i https://pypi.tuna.tsinghua.edu.cn/simple
查看 tensorflow、torch 是否可用:
python -c 'import tensorflow as tf; print(tf.test.is_gpu_available())'
python -c 'import tensorflow as tf; print(tf.__version__)'

python -c 'import torch; print(torch.__version__); print(torch.cuda.is_available())'
python -c 'import torch; print(torch.cuda.get_arch_list())'
Hugging Face
默认下载路径
Windows 10 会将模型下载到默认的缓存目录中,位于 C:\Users\<你的用户名>.cache\huggingface\hub,Ubuntu 22.04 则位于 root/.cache/huggingface/hub(root账号操作)。假设 Python 使用模型的代码是 BriaRMBG.from_pretrained("briaai/RMBG-1.4") ,那么 Ubuntu 22.04 会下载到 /root/.cache/huggingface/hub/models--briaai--RMBG-1.4。以上操作必须使用魔法。
若您使用的是 docker compose,那么推荐将下载的文件从 .cache/huggingface 这级目录映射到容器内,例如:
services:
  xxx:
    image: xxx
    container_name: xxx
    volumes:
      # huggingface 模型
      - "${TPQXBDATA_HOME:?err}/rmbg/huggingface:/root/.cache/huggingface"
如何下载模型
学习AI项目,免不了从 https://huggingface.co 下载模型文件,可惜国内无法访问,若使用代理必须启用Global才行,若不用Global模式,有时设置DNS为 8.8.8.8 8.8.44 也行,但有时又不行奇怪。
官方 huggingface_hub(推荐)
huggingface-cli 属于官方工具,其长期支持肯定是最好的,非常推荐。
pip install -U huggingface_hub
huggingface-cli login --token <HuggingFaceToken>

# 我喜欢开 Windows PowerShell 来下载,退出直接关闭窗口,否则退出不好退
huggingface-cli download --resume-download black-forest-labs/FLUX.1-dev
对于一些下载特别慢的文件,推荐复制下载地址后放浏览器里去单独下载,下载完后放回默认目录即可,Hugging Face 快速入门
单文件下载并打入镜像
尝尝遇到的问题是,项目中用到了API接口来在线获取 huggingface 站点的模型文件,例如 stable-diffusion-webui 启动时就会去自动下载 models--openai--clip-vit-large-patch14 模型文件,相关代码在 stable-diffusion-stability-ai\ldm\modules\encoders\modules.py 文件里:

网上说手工下载下来后,把参数 version 改成本地绝对路径,但我试了还是不行,会报其他错误,下面分享下我的解决过程:
(1)首先使用 docker run -it --rm 进入容器,添加http代理配置:export http_proxy="http://192.168.3.40:7890" && export https_proxy="http://192.168.3.40:7890",代理要用 Global 模式。使用 curl https://google.com 测试下代理是否生效。
(2)容器内运行 python3.10 launch.py 触发 huggingface 下载接口调用,此时界面快速出来下载的文件名,其中有个文件名叫 tokenizer_config.json。
(3)下载完成后,使用 export http_proxy="" && export https_proxy="" 关闭代理。
(4)使用 find / -name tokenizer_config.json 查找下载文件位置,结果在 /root/.cache/huggingface/hub/models--openai--clip-vit-large-patch14/snapshots/32bd64288804d66eefd0ccbe215aa642df71cc41 目录下。
(5)使用 docker cp 命令将容器中 /root/.cache/huggingface 目录整个拷贝到容器外,这个目录下的refs/main 文件里有一串 uuid 字符串,是指向 snapshots 目录的子目录的,这是 models--openai--clip-vit-large-patch14 模型具体存放的位置。因此我们在做 docker 镜像时,只要将 cp 出来的整个 huggingface 目录映射到 /root/.cache/huggingface 即可,就不会触发代码中下载这些文件了。
repo方式下载(通过Git)
# 设置全局代理
git config --global http.proxy http://127.0.0.1:7890
git config --global https.proxy http://127.0.0.1:7890
# 取消全局代理
git config --global --unset http.proxy
git config --global --unset https.proxy

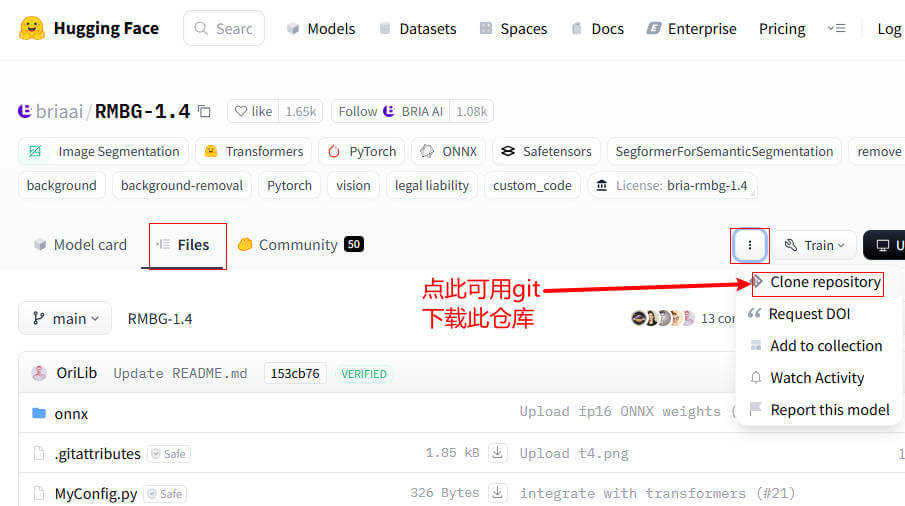
设置好全局代理后就可以通过下图方式克隆仓库了。
使用 git 克隆仓库有个小问题,就是 .git 文件太大了,可删除它!
克隆仓库

repo方式下载(通过代码)
第二天使用其他功能时又卡在无法下载 bert-base-uncased 模型,一个个文件下载太麻烦,且一旦设置代理,程序就起不来了。查了下官网提供了一种更好的方法,直接可以下载 repo。具体步骤是:
(1)先进入容器设置代理
export http_proxy="http://192.168.3.40:7890" && export https_proxy="http://192.168.3.40:7890"
(2)输入 python3.10,执行下载命令
from huggingface_hub import snapshot_download
snapshot_download(repo_id="bert-base-uncased")
(3)使用 find 命令查找下载的位置发现与使用上面代码下载 openai/clip-vit-large-patch14 是一样的

因此上面的模型也可以使用下面命令来下载:
from huggingface_hub import snapshot_download
snapshot_download(repo_id="openai/clip-vit-large-patch14")
(4)下载完成后关闭代理
export http_proxy="" && export https_proxy=""